EPICURE User's Guide<P> Volume III: Application Programmer's Guide<P>
Research Division Controls Software Release Note
37.2
EPICURE User's Guide
Volume III: Application Programmer's Guide
Research Division Controls Software Release Note
37.2
William S. Higgins, E. Dambik, F. J. Nagy,
J. C. Schmidt,
A. D. Thomas, and R. West
Contents
EPICURE User's Guide Volume I: Guide to EPICURE for Beamline Users
Brief Introduction for New Users
About EPICURE
Obtaining an Account and Logging In
Security
How to Get Help
Device Privileges
Using the PIGEE Protection Manager
Standard Features of Applications
A Walking Tour of ESM_DEMO
The MENU Program
The PAGE Application
The PLOT Application
The WATCH Application
Commanding a SWIC Scanner
Displaying SWIC Profiles
Querying the Database
More Information: Guide to Software Release Notes
EPICURE User's Guide Volume II: Guide to EPICURE Operations
Rebooting & Doing Backups
Broken Machines
Recovering from Failover
Adding a Node to the Network
Managing the Database
Adding a Device
Details of Protection
Using DBPEEKER
Feeding the BEAR
Other Datalogging Applications
Navigating the Crate Maps
EPICURE User's Guide Volume III: Application Programmer's Guide
System Overview
Introduction
A replacement of Fermilab's former beamline control system,
EPICS,
has been commissioned and is known as EPICURE (for EPICS User
Resource Enhancement). This document explains the model adopted for
addressing data sources and control points in that new system.
We also describe
an associated Device Database to support and extend the
basic information services. One example of such an extension is that
the
physical location of a device, both in absolute terms and in
relation to other devices, may now be included in the Device
Database.
All these facets of the new control
system are grouped under the broad category of data services and
are specified here. In large measure, these specified data
services extend those previously provided by EPICS to new
functionality on existing hardware and to the support of entirely
new hardware.
Programmers wishing to write applications for EPICURE will find the information
they need on the structure of the Device Database and the operation of data
acquisition services. The example programs discussed here may be extended
to perform a wide variety of tasks.
Acknowledgments
The methods used here draw heavily upon the design and
implementation experience of both ACNET (the Tevatron accelerator
control system) and EPICS. We refine and
extend the ideas from those systems to the extent that they apply
to the new beamline control system.
We believe the resulting synthesis to be
a significant step forward.
Networking Aspects
The EPICURE system is implemented as two networks, the consumer
network and the data acquisition network. The consumer network is
comprised of VMS nodes appearing on the laboratory-wide
DECnet/Ethernet network. This allows a wide number of existing and
future processors to connect directly with the system and utilize
much of the same software. The second, or data acquisition network
is basically composed of three stand-alone VME-based systems
each of which
shares access to an existing beamline serial CAMAC branch (with
the existing EPICS data acquisition processors). While not much of
a ``network'' in its present form, it is specified in such a way as
to allow growth into a distributed processing architecture in the
future.
The distributed system accommodates a mixture of existing CAMAC hardware
with new CAMAC links and crate controllers as well as a block data link
replacement based upon commercial silicon (ARCNET).
An overview block diagram of the phase one
implementation is shown below:
�
In the above diagram, ``ET'' represents an ``educated terminal,''
or workstation, which
supports each user with a dedicated processor.
``AP'' denotes an application processor which serves
multiple functions possibly including some user-written
application programs which are controlled through conventional
terminals. Boxes shown to the right of the ``bridge'' are also on
the the site-wide DECnet but are not located at the Operations
Center. ``Exp'' nodes represent experimenters'
on-line or data acquisition computers.
EPICURE Design Note 14 expands upon the architecture of the
EPICURE system and its future directions.
The Device Database

Device Database Introduction
The Device Database is the repository of static information
about devices. In particular, the Device Database provides the
information that the data acquisition subsystems require in order
to construct and process data requests. The Device Database
defines not only the data storage but a specified access protocol
and service routines to implement the protocol. Application
programs and other software layers then use these service routines
to access Device Database information.
The Device Database is a dual database and has aspects of both a
centralized and a distributed database. The Source database is the
master copy to which new devices are added and in which existing entries
are modified. The Optimized Access database (OA view) is derived from
the Source database by a transformation program (still under development)
which extracts and reformats the data. The Device Database service
routines access data from the OA view. The OA view organization is
optimized for efficient access while the Source database is organized such
that commercial software (a product called ``Rdb'')
can be used to access and maintain the Source
database. The Source database is organized as one or more disk files at a
central node so as to facilitate device entry and modification. The Source
database will be accessible from Rdb for the purpose of modifying entries
and preparing reports.
The Source database is maintained on a single network node
(the Database Master node) which allows multiple users
simultaneous access to the database for purposes of adding new
information, modifying existing information and generating
reports. Multiple copies of the OA view are distributed about the
network. Those nodes which require efficient and frequent access
to the OA view have their own local copy of the OA view; other
nodes can access the OA view resident on a ``nearby'' node. Because
the Device Database is distributed in this manner, it
can only contain ``static'' information, unlike the ACNET database
which also contains setting values and some dynamic alarm
information. Modifying the Source database,
which is now done by system programmers,
will be possible for certain other users when a database editor becomes
available.
This section of the document
describes the interfaces between the database system and the user.
Devices
The Device Database uses a
``two-dimensional''
scheme of
naming devices and the data they may source.
Every datum is associated with a ``device'' and
a ``property.'' Devices and properties are the two dimensions of the scheme.
This scheme
is elaborated below in Section
 .
.
Each device has a
textual name and a binary identifier, the device index or DI.
There is no structure, geographical or otherwise, to the DI's
maintained in the database. Since a DI can be stored in a 32-bit
integer, it represents an efficient database key for applications
and systems programmers.
The Device Database also contains special types of devices
for several purposes:
- Synthetic Device
- The synthetic device is not a real, physical
device but represents a value that is a
function of one or more other devices' present
readings.
The data acquisition subsystem uses the
mathematical relation stored in the Device
Database to connect the synthetic-device
values with the physical devices.
- Non-device
- This is a device which appears in the
database but which the data acquisition
subsystem cannot process. The primary
purpose of the non-device is to allow the
database to store and return information
(such as location) about devices in the
beam lines which are peripheral to the
control system. An example of a non-device
would be a hand-operated valve in the LCW or
vacuum systems.
- Compound device
- The compound device is another place-
holder in the database, permitting a list
of associated devices to be stored in a
common place and format. The relationship
between the devices is defined by the
applications using the compound device; to
the database, it is simply a list of
devices.
Properties and Attributes
Each device exhibits several fundamental properties. At the
minimum, a device exhibits both DI and NAME properties. In some
sense the properties represent items which may be read from or
written to the device. Properties are defined by a property code
and are system-wide definitions and applicable across all
devices. This does not mean that all devices have all the defined
properties, only that the identical property code selects the same property
for every device having that property.
Some properties require auxiliary information which does not
belong in the category of yet another device property, because this
information is really associated directly with a specific
property of the device and not with the device as a whole. This
is called an ``attribute.''
Examples of such attributes are items such as scaling constants
which are associated with the READING or SETTING properties of
devices with the appropriate A/D or D/A-like channels. Attributes
are defined by an attribute code, and are specific to a
property, so that the same attribute code may mean different things for
different properties. A property can be thought of
as a record of information about the device and an attribute as a
field of that record.
The following properties are currently defined in the Device Database:
- DI
- Device Index. This is just a number and is
(along with the NAME property) one of two master keys into the database.
The DI is a
property to allow the name-to-DI conversion to
be implemented by a standard database service
request. The DI is treated as a 32-bit number,
but only the low-order 20 bits are used as the
index. The format of the DI is described in
detail in a later section,
.
- CLASS
- The device class categorizes the device for
the data acquisition system and application
programs. A standard device, which usually
represents some piece of hardware, is
classified as a NORMAL device. A SYNTHETIC
device is one which is synthesized by the data
acquisition system from one or more other device values
by
a preset algorithm. A NONDEVICE appears in
the database to assist applications (in
particular, graphics applications) but is not
accessible via the data acquisition system. A
COMPOUND device also appears in the database
(and not in the data acquisition system) and
provides a means to hold a list of related
devices.
- NAME
- Device's name. This can be thought of as the
human-equivalent of the DI. It is a text
string of any form agreeable to the user
community. The name is a 12-character fixed-length
string, filled with spaces on the
right. It is not an arbitrary string, but indicates
beamline, device type, and location of the device according to a nomenclature
standard. This standard is maintained by the Site Operations Department;
currently Romesh Sood serves as its czar. See the document ``Conventions
used by E. A. D.''
- TEXT
- This is just some descriptive text for those
applications which want to display it. For example,
for the device with NAME ``PE3SEM,'' the TEXT string might be
``PE Secondary Emission Monitor.''
- READING
- Device's reading. At the least this has the
attributes of SCALING, SOURCE_CLASS, READ_PROT, SIZE,
RATE and ADDRESSING. The SCALING attribute
contains the scaling function description and
the necessary scaling constants. The
ADDRESSING attribute contains the information
needed by the lower levels of the data
acquisition system to actually retrieve the
device's reading (a DAP or the like). The
SIZE attribute returns information on the size
of the READING data. The RATE attribute
returns information on default data
acquisition rates or sample times for the
READING. The SOURCE_CLASS attribute specifies the
preferred Front End data source by its DECnet
node name. The READ_PROT attribute specifies
the read protection for the device if needed.
If the device is a synthetic device, then this
property may also have a FUNCTION attribute.
- SETTING
- Device's setting. This is similar to the
READING property but is really its inverse.
The SETTING property also has SCALING, SIZE,
SOURCE_CLASS, READ_PROT, WRITE_PROT and ADDRESSING
attributes. The READ_PROT attribute applies
to be privilege to read the device setting;
the WRITE_PROT attribute applies to the
privilege to change the device setting. If
the device is a SYNTHETIC device, then this
property may also have a FUNCTION attribute.
- STATUS
- Device's digital reading, similar to the
READING property but represents the binary
logic information rather than the A/D
information. Since STATUS is really an array
of bits containing digital information, the
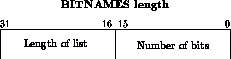
BITNAMES attribute contains a series of text
strings to provide displayable names for the
various STATUS bits.
- CONTROL
- Device's digital control, similar to the
SETTING property in the same way as the STATUS
property is analogous to the READING property.
Like STATUS, CONTROL also has a BITNAMES
attribute.
- READING_ALARM
- Static alarm information associated with the
READING (or A/D) monitoring of the device.
Dynamic information, such as current condition
or bypass state, is maintained in the front
end system. This property has attributes
similar to the READING property.
- STATUS_ALARM
- This property is related to the STATUS
property in the same manner as the
READING_ALARM is related to the READING.
- SAVE_RESTORE
- If present then device is saveable (that is, its current
setting can be saved by an application and restored at a later time).
In the future, additional information may be made available in this property.
- BEAMLINE
- This property is used to identify a device as
belonging to one or more beam lines. The
property is a list of beam line names which
are specified as short (4 character) text
strings.
- LOCATION
- The location information returned includes the
(X,Y,Z) coordinates of both the upstream and
downstream ``edges'' of the device and a pair of
links to the preceding and trailing devices
in Z order.
- DEVTYPE
- Encoded device type specified as a device type
number and a modifier number.
- LIST
- This property is present only for COMPOUND
devices. For those devices, it stores the
list of DI's being gathered into a set.
The Source database contains additional information which
does not appear in the OA view. Such information, which only
appears in the Source database, is there for the purpose of
producing reports and is not needed on a regular basis
by the on-line control
system. Some of these additional properties include:
- XTEXT
- Extended Text Block. This is a block of text
containing additional device descriptions,
help, and other information about the device.
- MODULETYPE
- This is a text string describing the device by
giving a CAMAC module type. In the future,
this may also be module type on some other
type of crate system, such as VME.
- MODULELOC
- This is a text string describing the module's
location by, at least, giving the building
name, crate and slot numbers.
- HISTORY
- This is a maintenance history of the device to
be used in generating reports.
The sections below give details of the formats returned when attributes
and properties are requested.
Definitions of the formats can be found in the file EPICURE_INC:DBUSER.H.
Common Attribute Data Formats
This section describes the format of the data returned by
accessing those attributes common to several of the properties of
devices. These descriptions are not meant to specify precisely
how the information is stored within the database, only the format
of the information as returned by the database service routines.
All fixed-length text fields are always padded on the right
with spaces. Variable-length text fields are preceded by a byte
(or word in some cases) giving the character count. The
properties which use these common attributes are READING, SETTING,
STATUS, CONTROL, READING_ALARM and STATUS_ALARM.
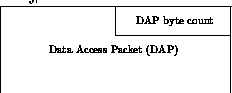
- ADDRESSING
- This attribute returns the information needed
by the data acquisition subsystem to address
the device. The DAP byte count field gives
the length of the DAP, inclusive of the byte
count field itself:
A side note on the ADDRESSING attribute
information: although the OA view returns a
DAP to be used directly by the data
acquisition subsystem, the Source database
will probably not store a DAP but will instead
store the necessary information (ie., node,
CAMAC CNAF, etc.) for the transformation
program to build a DAP into the OA view.
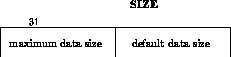
- SIZE
- The SIZE attribute returns information on the
data returned by the data acquisition system
for the device and property. The default and
maximum return data sizes (given in bytes) are
given in a single 32-bit longword:
- SOURCE_CLASS
- This attribute returns a 6-character text
string which is the name of a data source
class. This name is not the name of a DECnet
node, though it may be translated to one at
run-time. This allows a means of logically
redirecting requests around failed gateway (front-end)
nodes
when an alternate data source exists. It
also provides a hook for future attempts at
dynamic load balancing across gateways.
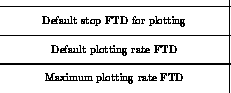
- RATE
- The RATE attribute returns information on the
default sample rates (or times) for normal and
plot data acquisition. These defaults do not
affect device settings (write operations), but
do apply to the readback of the SETTING
property via the data acquisition system. The
format is an array of FTD longwords:
- SCALING
- The SCALING attribute returns information
concerned with units conversion. The format
and use of the returned data is covered in
another chapter. The current format is an extended
version of, and is compatible with,
the ACNET PDB (Process Data Block). It includes a length
field as the
first byte. The length is in bytes and is
inclusive of the length field.
- READ_PROT
- The format and use of the returned protection
information is not yet specified. Future revisions
of this document will deal with device protection.
Protection.
- WRITE_PROT
- Same format as READ_PROT.
- FUNCTION
- This attribute is used only for synthetic devices
to specify the algorithm and devices to be
used to calculate the synthetic device quantity.
See Epicure Design Note 44 for a specification of its
format.
- BITNAMES
- This is a list of one or more items of the
format:
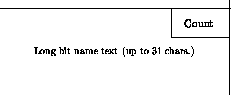
The valid range for the bit number is 0 to 31
or the maximum size of the STATUS data (or
7/15 for 8/16-bit data). The length field for
each BITNAMES item gives the inclusive length
of the item in bytes. The exact format of the
display ``color'' fields is left undefined by
the system. The intent is that system
application programs be allowed to establish a
convenient convention for their use. The
short bit name text is meant to be an
abbreviation of the long bit text for use on
more ``crowded'' displays.
The list is preceded by a longword with a
count of the number of entries (bits defined)
in the list and an inclusive length (in bytes)
for the entire list of BITNAMES:
Property Data Formats
This section describes the format of the data returned by
accessing the various properties of a device. These descriptions
are not meant to specify precisely how the information is stored
within the database, only the format of the information as
returned by the database service routines.
All fixed-length text fields are always padded on the right
with spaces. Variable-length text fields are preceded by a byte
giving the character count.
- DI
- 32-bit integer with bits 24-32 set to 0. The
32-bit DI value of 0 is reserved to indicate
``no device''. Bit 22 (the ``EC'' bit) is set to
indicate that this is a ``native'' EPICURE
device; if bit 21 is zero then this is an
ACNET DI and is passed to the EPICURE-to-ACNET
gateway for data acquisition.

The CD bit (bit 23) is set for compound
devices (see device CLASS below) for both
EPICURE and ACNET devices.
- CLASS
- The device class code is returned in a 32-bit
longword. The four device class codes defined
are:

- NAME
- A 12 character fixed-length string, filled
with spaces on the right.
- TEXT
- A byte of character count followed by up to 31
text characters. The character count byte is
not included in the count of text bytes, so static
allocation for this property should accommodate 32 bytes of storage.
- READING
- The data formats returned by the attributes of
the READING property are shown in the section
on Common Attribute Data Formats.
- SETTING
- Same as READING.
- STATUS
- The data formats returned by the attributes of
the STATUS property are shown in the section
on Common Attribute Data Formats.
- CONTROL
- Same as STATUS.
- READING_ALARM
- The data formats returned by the attributes of
the READING_ALARM property will be described in a
future release of this document.
- STATUS_ALARM
- Same as READING_ALARM.
- SAVE_RESTORE
- A 32-bit longword is returned with TRUE (-1)
if this property is present and FALSE (0) if
this property is not present for the device.
- BEAMLINE
- List of the beam lines to which the device
belongs as a list of beam line names:
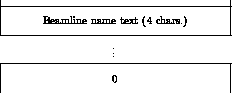
The list of names is terminated by a longword
of 0. If the device belongs to no beam line
or there is no beam line property, a single
longword of 0 is returned.
- LIST
- This property is only used by COMPOUND
devices. It returns the list of devices which
form the Compound Device:

The list of DI's is terminated by a longword
of 0.
- LOCATION
- The location information is returned as:
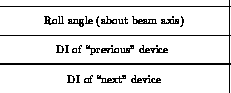
For the links, ``previous'' and ``next'' device
are defined by the upstream end Z coordinates.
The devices with a location are thus tied into
a single list ordered by their upstream Z
positions and permits nearby devices to be
located given a single device.
- DEVTYPE
- The DEVTYPE attribute returns information on
the device type encoded in a single 32-bit
longword:
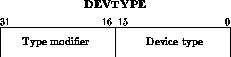
The device type code selects a class of device
such as a BEND or QUAD magnet, etc. The type
also selects the symbol used to represent the
device in maps on display screens. The
modifier is used to represent subtypes of a
particular class of devices (for example, a 4-2-240 dipole
or a 3Q120 quadrupole).
- MODULE_TYPE
- A fixed-length string (eight characters) which identifies
the database module template to use for a given device and property.
- DISPLAY
- Alarm text message and display-control information. Its
format is tentative, awaiting further definition of the EPICURE alarm system.
- CTLNAMES
- Defines bit masks for the CONTROL property.
The only flag defined is DB_M_CTL_MERGE. If this flag is set, bit masks can
be merged.
Each element of the array looks like this:

- Text-Blocks
- Several text string properties from the Source
database are returned in a common format.
These include MODULETYPE, MODULELOC, HISTORY
and XTEXT. Requests for these properties are
expected to occur at a much lower rate than
for the other properties (whose information
appears in the OA view). The EDBSERVER will
access this information via a Source database
server on the Master node. The return data
format for these properties is:
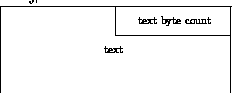
The byte count is
16 bits long
and counts only the number
of bytes of text and is NOT inclusive of the
byte count field itself.
The HISTORY property may return only the most
recent ``history record''.
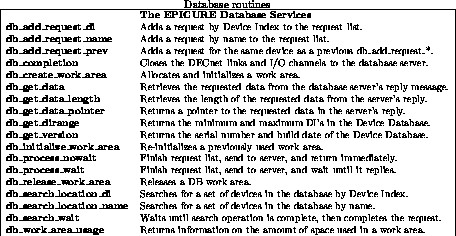
The Database Services
To access the Device Database, an application program calls database services
from the EPICURE library. These services have names which begin with ``db_''
and are listed in Table
. For a discussion of how to use them,
see the example in Section
.
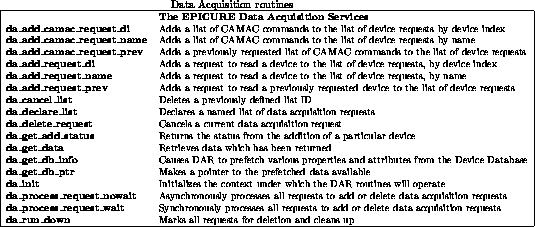
Data Acquisition
The Data Acquisition Services
An application program implements data acquisition by calling the EPICURE
data acquisition services.
Each of these has a name which begins with ``da_,'' and
can be found in the EPICURE Library. See Table
for a brief list
of them; more information can be obtained by typing
HELP @FERMIHELP EPICURELIB DA_ servicename
We will meet them again when we encounter an example program in Section
.
Assumptions
The following are assumed as characteristic of the usage patterns of the
EPICURE data acquisition system:
- Readings occur with far greater frequency than settings.
- Repetitive readings (synchronous or asynchronous to the
accelerator cycle) occur with greater frequency than
``one-shot'' reading requests.
- At any instant in time, a fairly small subset of all
available data is actually of interest.
Two-Dimensional Addressing
All programs which request data acquisition services do so by
specifying a device and property. This ordered pair,
(device_index_or_name, property), corresponds directly to the
DEVICE and PROPERTY definitions outlined in the discussion of the
device database (Section
). Note that the attribute
qualifier is not allowed
for data acquisition or setting requests.
Further, properties which do not define the ADDRESSING attribute
may not be requested of the data acquisition system. For example,
the TEXT, BEAMLINE, and LOCATION properties are properties of
which the data acquisition engines are totally unaware.
Requesting such properties from the data acquisition services is
considered an error. (Similarly, the database cannot directly
source the current device READING, SETTING, or STATUS properties
but only supply the ADDRESSING attribute which allows the data
acquisition system to obtain those values.)
Selective Data Acquisition
The system does not maintain a pool of all possible values of
interest. Rather, it allows application programs running
anywhere in the network to specify the items of particular interest from
the data acquisition system. Each requesting program may specify
a time (relative to the accelerator cycle) or
asynchronous frequency at which a datum is to be returned. In
order to minimize network overhead, all requests of a like sample
time or frequency at a requesting node which are bound for the
same source node are merged into a single request list.
The Data Requester Process, DAR
All VMS nodes which request the services of the selective data
acquisition system do so through a process called the Data
Acquisition Requester, or DAR. All programs communicate
requests to DAR by using a standard set of library routines.
These routines manage additions and deletions to a (per process)
Request List maintained in a global section (common memory block
shared by many processes) on the requesting node. In this case,
the global section must be mapped by the DAR and all application
programs which desire data acquisition services. The requesting
application names the datum of interest by supplying a DI (device
index) or device name and a property index. Additional parameters
such as time or frequency of collection may optionally be
specified with each request.
When a request is made of the DAR, it will access the OA database
(transparently, whether local or remote) and look up the
SOURCE_CLASS attribute and translate it into an actual DECnet node
specification for each item on the new request list. Various
other values are also retrieved at this time (such as default
data lengths, default sample time and even scaling constants for
selected properties). Memory is allocated to receive the returned
data. The DAR then merges all valid new requests into any currently
active data acquisition lists which are for a like frequency (or
sample time) and source node. Any new or modified request
lists are then transmitted to the appropriate source nodes.
Replies from the current (now previous) data acquisition list(s) continue
to be appropriately routed until the first reply to the new (merged) request
list arrives (indicating the front-end has started processing the new list).
The front end processor is a MicroVAX-II and serves only to
coordinate the collection of data. The actual timed collection is performed by
dedicated hardware, the data acquisition engines. When a request
list is fulfilled, the front end transmits the acquired data back
to the DAR at the requesting node. The DAR process on the
requesting node receives the network message into the global
section described earlier and performs any application process
notification (signalling an AST or setting an event flag).
Applications retrieve their data only via library routines to
maintain transparency.
The Data Source, DAS
All nodes acting as source nodes for the selective data
acquisition system do so by providing a Data Acquisition Server or
DAS process. This process is the target for all requests by DAR
processes on requesting nodes and must be able to service requests
from multiple requesting nodes. All
front end processors execute a similar DAS process. In
principle, the DAS process on one front end node may be entirely
different from one on another node as long as it adheres to the
EPICURE data acquisition protocol. This flexibility,
allows the integration of ``gateways'' to other networks (such as
ACNET). We also take advantage of this modularity to implement
combined function cryogenic workstation which also serve as
data acquisition systems (interfaced to 'frig Multibus systems).
Frequency-Time Descriptor, FTD
The data acquisition system allows the specification of a
sample time within the accelerator cycle or an asynchronous
periodic rate for each data request. A uniform method of
specifying such a time or rate is defined and is called a
Frequency-Time Descriptor or FTD. We define the following
descriptor for this purpose. It is similar to that already used by
EPICS and ACNET. It is defined to be a single 32-bit longword.
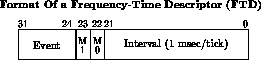
The 2-bit M field is used to qualify the request.
- M=0
-
Descriptor specifies an asynchronous periodic rate. The
value of the interval field specifies the period in
units of one millisecond per tick. The value of the
event field is ignored.
- M=1
-
Descriptor specifies action synchronized to occurrence
of a phase reversal clock (sometimes called ``T-time'') event plus the unsigned delay
interval (in milliseconds). The reserved event code
FE
 specifies that the delay interval is synchronous
with the time of the request arrival (ie. ``now plus
delay interval'').
specifies that the delay interval is synchronous
with the time of the request arrival (ie. ``now plus
delay interval'').
- M=2
-
Descriptor specifies action synchronized to occurrence
of a
 (Tevatron clock) event plus the unsigned delay interval (in
milliseconds). The reserved event code FE
(Tevatron clock) event plus the unsigned delay interval (in
milliseconds). The reserved event code FE
 specifies
that the delay interval is synchronous with the time of
the request arrival (ie. ``now plus delay interval'').
specifies
that the delay interval is synchronous with the time of
the request arrival (ie. ``now plus delay interval'').
- M=3
-
Reserved for future expansion.
Note that the maximum specifiable interval corresponds to
approximately 1.16 hours.
The 8-bit Event field holds the number of the particular clock event of
interest. For example, if the event is the T5 phase reversal, M is 1 and the
Event field is 5. If the event is Tevatron clock event 44, M is 2 and the
Event field is 44.
The 22-bit Interval field holds the delay, in milliseconds, between the
reference clock event and the moment you wish to specify. For a time 100
milliseconds after T5, the Event field is 5, M is 1, and the Interval field is
100. Thus the value of the FTD would be

Timestamp Format
Every datum returned by the data acquisition system is
time-stamped. The single timestamp format serves two major
constituencies. The format of the timestamp is:

Those programs which need to know the time relative to the
start of the accelerator cycle use the second longword. The
microsecond precision does not imply that all elements of the
control system are capable of measuring time this accurately. It
allows the system developers to use a common format in order to
measure the performance of the system itself. It may also become
useful in the future if buffered digitizers are installed which
are actually capable of such resolution. There is no perceived
need for the control system to support sub-microsecond timing.
There is another class of program, of which datalogging is an
excellent example, which is concerned with the date and time of
day. The ``clink'' field in the EPICURE timestamp is intended to support
these applications. A clink is an abbreviated 4-byte form of a VMS
clunk. A VMS clunk (clock unit count) is defined as the quadword count of
100 nsec ticks since Smithsonian zero (hr:mn:ss mmm-dd-yyyy).
An EPICURE clink measures time as the count of seconds from some
arbitrary starting time; in our case 00:00:00 on January 1, 1972.
This format is useful even in its raw form as a primary key into
an ISAM file for logging purposes. A 31-bit clink can record time
for 67 years or until the year 2039 with one second resolution at which
time the clock may be re-biased by the next generation of EPICUREans.
Since clinks are in linear
time and not subject to act of Congress or other vagaries, the clink
domain is closed for addition. A suite of library
routines will be provided which will convert a clink into month,
day, year, hour, minute and second format (and back the
other way).
The Application Programmer's View
The calling sequences described in the EPICURELIB documentation (see
Section
for more information)
allow the user to
request data collection of random device readings and settings at
specifiable rates or times. The ``C'' language is adopted for
illustrative purposes as it is the system implementation language.
The reader is reminded that VMS supports cross-language calling.
A program may employ two methods for obtaining data: issuing independent
requests or declaring a list of requests.
In the first method, the user may view each request as whole
unto itself and unrelated to other requests made by the same
process. In this case, the calling program may adopt either of two
notification strategies---(1) poll for valid data returns by
periodically issuing da_get_data calls on all requested items (not a
recommended strategy) or
(2) specify an Asynchronous System Trap (AST) receiver which is activated upon delivery of
any new data to the node, allowing the program to check which of several
requests has arrived using
da_get_data calls. (The AST receiver is able to determine the FTD
of the newly delivered data in order to avoid non-productive
polls.)
In the latter case, the AST will be activated whenever any
data are delivered to the node and so some activations may result
in no data delivery of interest to the activated program.
In the second method, the programmer may declare lists of
individual data acquisition requests. A list may contain requests
for mixed sample time acquisition and is not considered to be
fulfilled until all the requests on it have been completed. The
programmer may elect to be notified of list completion by AST
activation. User lists which specify mixed sample time requests
incur a somewhat higher network overhead in the initial
implementation of the data acquisition system. Consequently, use of
mixed FTD lists
is discouraged unless actually required by an application.
A word of advice is in order.
When using the first
method, it is wise to notify the calling program with the
``less expensive'' AST strategy. The polling-loop strategy can be wasteful
of system resources, and could degrade performance if it is widely applied.
Use of the AST is discussed in Section
, as well as in the VMS
manuals.
Completion Status
All user interface routines to the data acquisition system
are invoked as functions which return a longword of
status in the standard EPICURE status format. This
is the standard VAX/VMS error format with specific user-defined
facility and message codes and is fully compatible with the lib$signal
and lib$stop library functions. See EPICURE Design Note 5, ``System-Wide
Status Code And Error Conventions,'' for more details.
Overview Of A Data Acquisition Engine
Startup
The host-a node known as a Data Acquisition Engine or ``front
end''---is the master. The host creates all common memory
data structures. In hopes of deterministic operating
characteristics, common memory in the VME crate
is allocated in blocks of fixed
size-there may be several different sizes (small, medium,
large, extra large) as necessary. Any processing element is
allowed to allocate a predefined memory block. The host issues VME
reset, resetting all other processors. The embedded processors within crates
and other devices are
just smart enough to initialize and start looking for code
downloaded to them by the host. In all other respects they are
quiescent. The host downloads the appropriate gelware to each
processor in turn. In the fullness of time all the little elves
become ready to start earning their keep. In practice initialization
and downloading may evolve to become much more complicated.
A Data Request Arrives
The host receives a network (DECnet) request for acquired data which
enumerates items to be collected at some common instant in time.
The host creates what will become a data acquisition list (DAL) by
formatting the header
information and building a timer control data acquisition packet (DAP) as
the first element
of the list. The host then trundles off to the database and looks
up the entry for each requested device, retrieving at least a skeletal DAP
for each
and linking it into the DAL request list for the data acquisition
engine. The host then allocates a disposition DAP as the last
element of the request list. Enough additional storage is
allocated in the list to accommodate all the possible returned
data and status. A shared memory block is allocated and the
request list copied to it. Finally, the host links the new DAL onto the
timer request queue and interrupts the Timer to notify it that a request
awaits.
The Timer Wakes Up
The timer removes the DAL from the input queue and examines
the DAP pointed to by the current instruction pointer (in the DAL
header) which contains the the kind of delay action to be
performed and any additional information (like time in the cycle
when this list is to be requested). The timer delays this DAL
until the requested time in the cycle occurs at which time it
fills in any status and advances the DAP instruction pointer. The
next (now current DAP) is examined and the DAL is linked into the
proper request queue in shared memory (and the target processor
interrupted). Note that the timer need not know what the target
queue actually does or how it does it. For purposes of exposition,
let's assume the target
queue handles simple CAMAC link operations (just a coincidence, of
course).
The CAMAC Processor Gets The Request
The CAMAC processor removes the DAL from its input queue and
executes the CAMAC operations described by the current DAP placing
appropriate status and data in the return data area of the list.
The DAP instruction pointer is advanced to the next DAP. The (now)
current DAP is examined and the DAL is linked to the appropriate
queue in shared memory (and its processor interrupted).
The End Of The List Is Reached
Eventually, the last DAP in the list is reached. Recall that
it was appended by the host (as the most immediate requester). As
might be expected, the completed DAL is now linked to a ``host completion''
queue and the host processor interrupted. The host removes the DAL
from the queue. The host processes its own DAP, hopefully,
according to the original nature of the user request. A reply message is
generated to the ultimate requestor of the data. At this time
the entire DAL is either returned to a queue of free memory blocks
or, for periodic requests, is restarted by passing it back to the timer
queue (and interrupting the associated processor).
So, It's Not Very Original
OK, we have simply described a rather simple state machine to
perform data acquisition. There is nothing very original about it.
It does take advantage of simple and highly modular code in
several processors, though, to distribute the work at hand. The
simplicity of the code for the embedded processors avoids
compromising already tight schedules. Adding a new embedded
processor in the future should be relatively painless (as might become
desirable for block data link/network support).
There is absolutely nothing which prohibits the embedded
processors which have been discussed from taking on additional chores. For
example, the ``simple CAMAC server'' could be augmented to support
multiple priority request queues. These could operate entirely
within the context of the state machine described above. A ``test
CAMAC'' queue could be added which operated entirely outside the
state machine. A more ambitious goal might find the addition of a
processing element to implement a multi-threaded GAS pipeline. As
complexity increases, an operating system kernel becomes
attractive. VRTX/32 has been pre-selected for this use. Many other
enhancements, including custom data
acquisition networks of similar VME crates, become realizable as a
natural evolution.
The point of all this is that great expansion potential has been built
into the basic design of EPICURE data acquisition.
Writing an Application: Two Examples
Two example programs are discussed here. The first, DATA_ACQ_EXAMPLE.C,
demonstrates the EPICURE data acquisition services by reading analog data from
a single device. The second, DATABASE_EXAMPLE.C, retrieves one ``fact'' from
the EPICURE device database in order to demonstrate database service calls.
Source code files for both programs are available on WARNER in the
EPICURE_EXAMPLES: directory.
Linking, Libraries, and HELP
Getting Help
Consult HELP @FERMIHELP EPICURELIB routine_name on the WARNER cluster
for details of particular routines called in these examples. This on-line
documentation of the routines, including their function and the types and
meanings of their parameters, is always the most current version. The command
HELP @FERMIHELP EPICURELIB TERMINOLOGY will give you a brief guide to
the jargon used in these descriptions.
A complete version of this documentation is also available as a
 \
file on the WARNER cluster. To obtain a printout, log
into WARNER and type:
\
file on the WARNER cluster. To obtain a printout, log
into WARNER and type:
$ @TEX$:TEXV2
$ LATEX RDCS$DOC:EPICURELIB
Then run QTEX on the resulting file:
$ QTEX EPICURELIB
Copy the file EPICURELIB.Q to your favorite laser printer.
But remember that this is a dangerous
practice-as soon as it's committed to paper, the documentation will begin
to rot away. As it ages, you run the risk that changes may have occurred
in the EPICURE service routines since you printed the file. Remember the
EPICURE documentation motto: Once it's printed, it's obsolete.
Consulting
If you need sage advice from a human being, type
HELP @USERGUIDE CONSULTANTS
to find out which of the EPICURE specialists knows the most about the
program or hardware you've got questions about.
Compiling and Linking the Applications
When modifying these or developing your own applications, compile them using
/DEBUG and /NOOPTIMIZE options in the compiler command if you want to use
the Debugger:
$ CC program_name/DEBUG/NOOPTIMIZE
(If, on the other hand, you are only compiling the existing programs
to try them out, there is no need to invoke the Debugger; simply compile
without these options.)
When linking these example programs, you must incorporate the libraries
which hold the EPICURE service routines (RDCS$LIB:EPICURELIB.OLB) and other
routines. Use the following form of the
LINK command:
$ LINK program_name, RDCS$LIB:EPICURELINK/OPTIONS
Again, if you wish to use the debugger, you should add a /DEBUG qualifier
to this command.
Data Acquisition: DATA_ACQ_EXAMPLE
The program DATA_ACQ_EXAMPLE.C is a simple example of a data acquisition
application.
It obtains and prints a reading from the device ME1LM1.
Note 1: Fetching data---The series of calls in a data acquisition
program does the following:
- Initialize data acquisition (da_init);
- Build a list with a series of data requests (da_add_request_name);
- Once the last device request has been added to the list you are building,
execute the requests
(da_process_request_wait). This routine asks the database for information
such as the CAMAC address of the device, builds low-level data-acquisition
lists using this information, and sends them off to the proper front-end
node(s);
- Go to sleep and wait until front end finishes getting the data (sys$hiber);
- When the data comes back, pluck it out and put it into an array
(da_get_data).
Every call to da_add_request_name returns a unique ``handle.''
After
execution of the list, you retrieve the data for a particular device request
by
supplying its handle to da_get_data. This routine copies the right data into
a variable.
In our example, the requested information is inserted into an integer called
``data.''
If we had more devices to interrogate, we would build a longer
list by including
additional calls to da_add_request_name-each of which would return
a unique handle. We'd
still have a single call to da_process_request_wait to execute the list.
Then we would perform several calls to
da_get_data, one for each handle, to make use of the returned information.
When you run DATA_ACQ_EXAMPLE, your screen will look like this:
$ RUN DATA_ACQ_EXAMPLE
Data value is: 1019
This program prints only the raw value returned from the device.
It does not ``scale'' the returned data-that is, it does not
convert the returned value into useful units such as volts or particle count
rates. The EPICURE services library includes functions to do this conversion.
They will be discussed in a future release of this document.
Note 2: Included files---These files contain definitions required
to compile and link your code:
- #include stdio The standard I/O header.
- #include descrip Descriptors to let
C understand VMS system service data structures.
- #include ``epicure_inc:ftd.h'' EPICURE Frequency-Time Descriptor
structures.
- #include ``epicure_inc:dbuser.h'' Database interface definitions.
- #include ``epicure_inc:daruser.h'' Data acquisition interface
definitions.

Note 3: Name descriptor---The statement used here for creating a
device name descriptor:
static readonly $DESCRIPTOR(name_descr, "PE3SEM");
works well for device names that are known and constant when you're writing
the application. A later release of this manual will discuss methods for
treating variable device names.
Note 4: The Asynchronous System Trap (AST)---The Asynchronous System
Trap (AST) is a
mechanism for interrupting a program's execution when a given condition occurs.
In VMS it is the standard way to handle such events as keyboard interrupts and
mouse movement. In EPICURE, it is used as a handy method to ``wake up'' programs
when requested data arrives from a front end node or database server node.
Once it's set up, an AST routine may be triggered at any time during the
execution of your program (that's why it's called ``asynchronous''). Control is
transferred to the AST routine and its code is executed. When the AST exits,
control is then
returned to the original program code thread, which continues from the point where it was
interrupted.
Keep your AST routines short and simple. In DATA_ACQ_EXAMPLE.C, the AST
routine is called ``data_here.'' It has only one line of code, a call to the
system service sys$wake, which pulls the main program out of the sleep induced
by its call to sys$hiber. This is expected to be a typical use for EPICURE
applications. In other programs, the AST routine does nothing but set a global
flag variable, and the main program executes particular code when it sees this
flag is set.
Another good rule is
Inside an AST, don't call any code (except for sys$wake)
that you haven't written yourself.
One reason for this is that functions you call-such as library math and
I/O routines-may not be re-entrant,
so they can get lost or scrambled if they are invoked within an AST.
What happens when multiple AST interrupts occur? They are queued in first-in,
first-out order. The first one is serviced,
and interruptions from further ASTs are disabled while it is executing.
AST #2 has to wait until AST #1 is
finished before it gets serviced.
See Guide to Programming on VAX/VMS for further discussion and
examples of using the AST. The sections
entitled ``Interrupting Execution with an AST'' and ``Special Input/Output
Actions'' contain valuable discussions; the latter has several examples (alas,
written in Fortran only). The corresponding manual in the VMS Version
5 set is called Guide to Programming Resources, and the interesting
sections are ``Using Asynchronous System Traps'' and ``Special Input/Output
Actions,'' respectively.
Note 5: Errors in data acquisition---The Data Acquisition Requester
must be running on the requesting node,
and the Data Acquisition Server process must be running on the source node,
for applications to complete successfully. But sometimes things can go
wrong.
DAR indicates any network errors in communicating with a front end by returning
a status code from da_get_data. Any of these errors will abort data acquisition
for that front end. A user may try to re-establish the network connection by
re-invoking a page or restarting their program. Briefly, some of the more
common messages and their meanings are:
- SS$_LINKABORT
- DAR has lost its network connection to DAS. DAS may no
longer be active.
- SS$_NOSUCHOBJ
- DAS is not running on the front end.
- SS$_PATHLOST
- The network path to the front end was lost. The
front end may no longer be running.
- SS$_UNREACHABLE
- Front-end node is not currently available on the
network. May be booting or otherwise tied up.
Querying the EPICURE Database: DATABASE_EXAMPLE
DATABASE_EXAMPLE.C is a short example of a database application. It retrieves
and prints the device index for the device PE3SEM. It is easily modified to
handle more devices or to ask for other kinds of properties and attributes.
Much of the information the database holds about a given device is retrieved
by the data-acquisition process, using a call to da_get_db_info. In
addition to fetching the addressing information needed to acquire data,
this routine can "prefetch" some other properties and attributes. Hence much
of your database querying can be handled by programs similar to
DATA_ACQ_EXAMPLE.C, and
for the most part you
will write a program like
DATABASE_EXAMPLE.C
only when you want to look at information unavailable
to da_get_db_info.
(However, the database service calls-those EPICURE functions whose names
begin with ``db_''---are fully capable of retrieving the same information
that da_get_db_info can get. Thus DATABASE_EXAMPLE.C may be easily modified
to return any piece of data in the database.)
Figure
gives a list of the properties and attributes accessible
to da_get_db_info (at the time of this writing; nothing is immutable!).
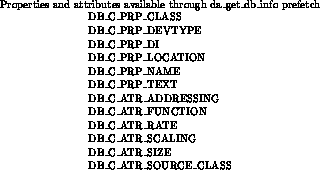
DATABASE_EXAMPLE.C retrieves the raw
device index (an integer), which has the property code DB_C_PRP_DI,
for the device PE3SEM.
Note 6: Querying the database---An application to retrieve information
from the database must do the following:
- Reserve a working area in
memory and open communications with the database server
(db_create_work_area);
- Build a list with a series of requests (db_add_request_name);
- After the final request has been added, execute the list (db_process_wait);
- After the execution is done, extract the data and put it into useful
form (db_get_data);
- When the program has finished, clean up by releasing the memory you
had reserved previously
(db_release_work_area).
Every request for a single piece of data, such as an attribute value, requires
a call to the function db_add_request_name.
This routine returns a unique handle for the request. Several such
requests make up a list, which may be assembled and executed in a single
work area. Extract the returned data
by calling db_get_data with the appropriate handle. In this example the
data are copied into the variable ``data_add.''
It is also possible for a program to create more than one work area, and
to build separate lists in the various work areas.
Note 7: DATABASE_EXAMPLE's included files---These are the same as
in Note 1,
except that ``daruser.h'' is omitted because DATABASE_EXAMPLE doesn't
use data acquisition.
Note 8: Work area size---The routine db_create_work_area takes a
guess at how much memory it needs to reserve, using the number of devices the
program will ask about, an ``average'' number of properties per device, and an
``average'' number of attributes per property. (These numbers are DEV_NUMBER,
PROP_NUMBER, and ATT_NUMBER respectively in this program.) The programmer
must supply reasonable values for these.
Note 9: Properties and attributes---Figure
is
a listing of the property codes and attribute codes by which the database
service routines refer to properties and attributes. A detailed description
of these is given in Section
, ``The Device Database.''
Knowing which attributes you can ask for depends on knowing the details
of the device type you're talking to.
These details are found in the database
definition of the device type.
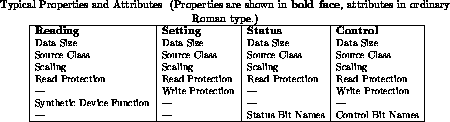
Among the most common data requested are the attributes associated with
the READING, SETTING, STATUS, and CONTROL properties.
Figure
shows their relationship. Different module types have
different combinations of these attributes.
A CAMAC 150 power-supply controller module,
for example, would have all of these attributes. A CAMAC 211 scaler module,
however, wouldn't have SETTING properties (nor any of the attributes
associated with SETTING), because it doesn't need to be set. A 211
module also does not have a STATUS property, but it does have CONTROL
and READING properties.
The device PE3SEM, like all the other EPICURE devices, has the
property DI (or Device Index), DB_C_PRP_DI, which the program
DATABASE_EXAMPLE.C retrieves and prints
out. It is a 211 scaler module, so it also has the property READING,
with the code DB_C_PRP_READING, and such associated attributes as ``Data
Size'' (DB_C_ATR_SIZE), ``Source Class'' (DB_C_ATR_SOURCE_CLASS), and
``Scaling''
(DB_C_ATR_SCALING). If we wanted to retrieve the Source
Class of PE3SEM, our program would include a call such as:
sts = db_add_request_name( &name_descr, DB_C_PRP_READING,
DB_C_ATR_SOURCE_CLASS, work_area, &handle[0]);
Since PE3SEM does not have a STATUS property, a request such as
sts = db_add_request_name( &name_descr, DB_C_PRP_STATUS,
DB_C_ATR_SOURCE_CLASS, work_area, &handle[0]);
would not find the desired information in the database, and would return an
error.
Note 10: Interpreting the returned data---When you run this program,
your screen will look like this:
$ RUN DATABASE_EXAMPLE
Data returned is 4195175
The DI is returned as a decimal integer. When asking the database for other
properties and attributes, the returned data may be in more complex form.
See Section
, Common Attribute Data Formats, and Section
, Property Data Formats,
for details. It is the applications
programmer's responsibility to manipulate these returned data into useful
form.
/*  Program DATABASE_EXAMPLE.C                     Bill Higgins  15 June 1988
  Example program using database service calls.  (see NOTE 6)
  We ask the database to tell us PE3SEM's device index (DI). */
#include stdio                          /* Standard I/O file (see NOTE 7) */
#include descrip                        /* Descriptor file */
#include "epicure_inc:ftd.h"            /* Time stamp structures */
#include "epicure_inc:dbuser.h"         /* Database setup */
#define MAX_DEV_CT 1                    /* Maximum of 1 device */
#define DEV_NUMBER 1                    /* Number of devices, properties, and attributes */
#define PROP_NUMBER 2                   /* Values for work area size estimate */
#define ATT_NUMBER 2                    /* (See NOTE 8)                       */
#define SIGNAL_FAILURE(s)       if (!(s&1)) lib$signal(s)
                                        /* Error message handling */
int sts;                                /* Define status variable */
static readonly $DESCRIPTOR(name_descr, "PE3SEM");
                                        /* Device name */

main()
{
        int work_area,di,data_add;      /* Work area and device index */
        long handle[MAX_DEV_CT];        /* As many handles as devices */

        sts = db_create_work_area( DEV_NUMBER, PROP_NUMBER, ATT_NUMBER,
                &work_area);            /*Reserve a working area  */
        SIGNAL_FAILURE( sts);
                                        /* Now build the list of requests
                                        (See NOTE 9) */
        sts = db_add_request_name( &name_descr, DB_C_PRP_DI, 0, work_area,
                &handle[0]);            /* 0 attribute suggests no attribute */
                                        /* for this property */
        SIGNAL_FAILURE( sts);
        sts = db_process_wait( work_area);
                                        /* Execute the list */
        SIGNAL_FAILURE( sts);
        sts = db_get_data( handle[0], sizeof(data_add), &data_add);
                                        /* Put the returned information into
                                        "data_add" */
        SIGNAL_FAILURE( sts);
        printf(" Data returned is %d\n", data_add);
                                        /* Any routines to decode data go here */
                                        /* (see NOTE 10) */
        sts = db_release_work_area( work_area);
        SIGNAL_FAILURE( sts);           /* Do cleanup */
}
Scaling and Timer Services
An EPICURE user may want to know the number of amperes flowing from a power
supply, but the raw data returned from the data acquisition system, in general,
come as cryptic collections of bits. Scaling services are available as
library routines to allow the application programmer to convert the raw data
easily and efficiently to appropriate formats for display and computation.
Raw data can be converted into floating-point values in the case of numeric
readbacks, or into easily understandable character strings such as ``ON,''
``OFF,'' or ``TRIPPED'' in the case of Boolean status readings. Scaling
services for conversion in the other direction are also provided: they can turn
a floating-point position value into a data format understood by routines that
set a motor-controller's position, or convert the string ``RESET'' into the
appropriate control bits to reset a module.
Every datum to be scaled, whether for readings or settings, is
associated with a property in the Device Database. This property must be
one (such as READING, SETTING, STATUS, or CONTROL) which has
the SCALING attribute defined. In the Device Database, the SCALING
attribute is used to contain the transformation indices, scale factors and
other information about operating on the acquired datum. Application programs
extract these facts from the Device Database and feed them (in a call) to one
of the scaling services, which will perform the desired transformation on
the datum and
return a value in the desired form.
In the case of a power supply reading, the raw datum might be a longword
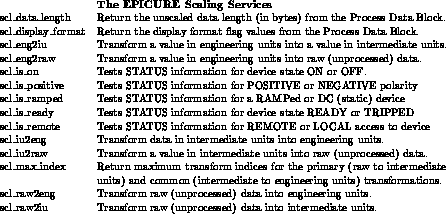
integer, the appropriate scaling service might be ``scl_raw2eng'' (converting
raw data to ``engineering units''), and the returned value would be a
floating-point number expressing amperes. The name of the units, e. g.
``AMPS,'' would also be
supplied in a separate string array. Details of the
transformation are transparent to the application programmer.
Scaling STATUS and CONTROL Values
It is easy to see how numeric data would be treated by scaling services.
A raw value may be multiplied by a constant, or used in a more complicated
function, to yield a floating-point number. It's a bit more difficult to
understand what the scaling services do with STATUS or CONTROL values, whose
raw bits are each a Boolean value without numerical significance (that
is, Bit 7 is not twice as important as Bit 6, but is just another flag).
Yet the treatment of these data is quite straightforward.
In checking a device's STATUS attribute, the data value is collected from
EPICURE in the same way as READING or SETTING data would be. It can then
be passed to a scaling routine as an argument. The programmer also specifies,
either by the choice of the routine he calls or as another argument,
the particular status function he'd like to examine,
such as the LOCAL/REMOTE bit or the IN/OUT bit. The scaling routine finds
the proper bit within the data value and returns its Boolean value. Thus
the programmer is spared not only the trouble of performing bitwise
manipulation of the raw data but also the necessity of knowing the exact
position of the desired bit in the returned data word. These details are
hidden from him by the EPICURE scaling services. (The curious programmer
may still investigate them by inspecting such files as DBUSER.H.)
In a similar fashion, the desired state of a CONTROL bit may be passed to
a scaling function, and it will do the right things so that a properly
formatted CONTROL word appears, ready for passing to one of the EPICURE setting
services.
At this writing only a few routines to manipulate STATUS or CONTROL bits are available.
Look for more soon at an accelerator near you.
Using the EPICURE Scaling Services
The available scaling routines are listed in the table below. Several of them
transform raw data into numeric values and vice versa. Others provide
information about the Process Data Block (PDB), which stores scaling
information. Not all scaling routines to transform STATUS and
CONTROL information are
available yet, but they will be implemented later.
At present special calls to determine the
status ON/OFF, POSITIVE/NEGATIVE, RAMPED/DC, READY/TRIPPED, and REMOTE/LOCAL
bits have been provided.
Unlike many EPICURE routines, conversion routines return numeric values,
not completion-status integers. The completion status of these routines
is still available as an integer parameter in the call, however. The
conversion routines are written so as to trap many errors which might arise
in processing data (e. g., divide-by-zero errors). Then they will return
a valid, if incorrect, numeric value. It's a good idea for the programmer
to check on the correctness of the returned number by testing the
completion-status value.
Overview of the Process Data Block
After scaling information for a particular device is retrieved from the Device
Database by the DAR services, a copy of it is
stored in a Process Data Block (PDB) in a reserved memory area.
 A pointer to this PDB can be passed to the scaling services when applications
call them. The scaling routines use various information embedded in the
PDB to do their job.
A pointer to this PDB can be passed to the scaling services when applications
call them. The scaling routines use various information embedded in the
PDB to do their job.
We will not do more than glance at the PDB's structure here. For details of
the scaling process, consult EPICURE Design Note 38, ``Device Scaling
Formul ,''
by F. J. Nagy and A. D. Thomas.
,''
by F. J. Nagy and A. D. Thomas.
Two types of conversions are supported: those between raw data and
``engineering units'' and those between raw data and ``intermediate units.''
Engineering units are the units most useful to the end user: amperes through
a magnet, counts on a scaler, volts on a high-voltage supply, and so forth.
Intermediate units are secondary units which may be useful in troubleshooting
a device. For instance, shunt current through a power supply is often
represented by a voltage which is read by an analog-to-digital converter.
Knowledge of this voltage will be helpful to a technician tracing a problem
with the supply. So the voltage at the A-to-D may be defined as an
intermediate unit in the Device Database.
Engineering-unit information in the PDB is designated ``Common Transform.''
Intermediate-unit information is designated ``Primary Transform.''
Some of the information stored in the Process Data Block includes:
- PDB Length
- in bytes.
- Input Data Length (IDL)
- A two-bit code giving the expected length of raw data
in bytes.
- Flag Bit MC
- Bit defining whether this device should be treated as a
motor controller for purposes of displaying its setting
and calculating new setting requests or as a D/A (or
other absolutely settable device).
- Flag Bit LS
- Bit defining the preferred precision for interactive
display purposes. Short format implies that a
six-character display is sufficient while long requires 8 (or
perhaps more) characters for output. The long format is
intended to provide for output of 24-bit timer values.
Most other data can use short format.
- Flag Bit DS
- Bit defining the default method of display for
interactive users, either decimal or scientific notation.
- Primary Transform Index
- A number which encodes the appropriate type of
transformation for converting raw data into intermediate units and vice versa.
Manipulations such as dividing by a constant, conversion to floating-point
format, addition of constants, or some combination of these may be necessary
on the data from a particular device. This index selects the appropriate
action from among these possibilities.
- Common Transform Index
- A number encoding the transformation between
intermediate units and engineering units. This can be one of many
computations,
from simple multiplication by a constant to a complicated formula with several
coefficients. (Constant coefficients are also stored in the PDB.)
- Common Transform Constants
-
Up to six constant coefficients can be stored.
- Units Text Characters
- Two four-character
``strings'' which give the text associated
with the intermediate or engineering units. These are not proper strings
as the C language sees them, since they are not terminated by the null
character. Be careful, therefore, in manipulating them. Unit names not
four characters long are padded with ASCII spaces on the right.
Using the scl_is_ Routines
The scaling routines which transform STATUS data begin with the string
``scl_is_.'' They return an integer value which is equal to -1 for TRUE
and 0 for FALSE. They operate only on the so-called ``generic'' status
bits, the reserved bits which are given special treatment in the Device
Database. At this writing there are
five generic STATUS bits: ON/OFF, READY/TRIPPED, REMOTE/LOCAL,
POSITIVE/NEGATIVE (polarity), and RAMP/DC.
(Other, more specialized, status bits vary in number and function from module to
module, and are not treated by the scl_is_* routines.)
To make use of these services, first make a reading request by calling
da_add_request and asking for the DB_C_PRP_STATUS property:
sts = da_add_request_name(&name_descr, DB_C_PRP_STATUS,
       NARG, &REQ_FTD, NARG, NARG, NARG, &handle);
Be sure to get a pointer to the PDB information. Note that the pointer should
be a structure of type DB_STATUS_SCALING:
struct DB_STATUS_SCALING  *dbscale_status_ptr; /* Status scaling information */
sts = da_get_db_ptr(&handle, DB_C_ATR_SCALING, &dbscale_status_ptr);
SIGNAL_FAILURE(sts);       /* Get pointer to scaling info from DB */
Then execute the list as normal. Let us suppose that you wish to check the
STATUS readback to see whether the ON/OFF bit is on or off. When the reading
is complete, and
da_get_data has been called so that the returned data has been placed in the
integer ``data,'' you can call scl_is_on. It returns an integer ``yesno''
which is 0 (off) or 1 (on):
yesno = scl_is_on(&data, dbscale_status_ptr, &sts );
SIGNAL_FAILURE(sts);
printf("ON Status is: %d \n", yesno);
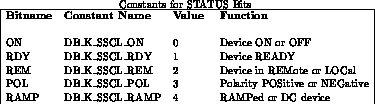
The constants corresponding to generic STATUS bits are listed in Table
.
Using Scaling Services in an Application Program
An example program which uses some of the scaling services can be found
in the file
WARNER::EPICURE_EXAMPLES:DA_SCALING_EXAMPLE.C.
This program is
quite similar to the program DATA_ACQ_EXAMPLE.C, which was discussed in
Chapter
. Modifications are necessary to set up the
scaling services and to call them properly.
DA_SCALING_EXAMPLE.C reads the READING and STATUS properties of a device,
obtaining pointers to scaling data through a database access, and feeds these
pointers to scaling routines to interpret both STATUS (Boolean) and READING
(numerical) raw data.
Numerical scaling routines to be used must be declared as external functions of the
proper type at the beginning of an application:
extern float scl_raw2eng();             /* Scaling routines-- must be   */
extern float scl_raw2iu();              /*  declared floating point!!!  */
extern int scl_iu2raw();                /* This one's an integer        */
Engineering units and intermediate units are always floating-point
values. This is true even if their initial source seems to be an ``integer''
device such as a scaler. Raw data are always integer values of one, two, or
four bytes. The transformations between raw, intermediate, and engineering
units yield up the proper data types as long as the application calls them
correctly.
Declare a pointer to each PDB structure you'll be using:
struct DB_ANALOG_SCALING  *dbscale_analog_ptr; /* READING data scaling info from DB    */
struct DB_STATUS_SCALING  *dbscale_status_ptr; /* STATUS data scaling info from DB    */
Note that these two pointers point to structures of two distinct types.
For each type of numerical conversion (engineering and intermediate units), the PDB
holds a four-character mnemonic. Recall that these characters are not
stored
as a standard C-language string, because they are not terminated by the null
character.
char units[5]; /* Units string for scaling */
These strings are passed by the scaling services, and the application has
the option of
printing them along with the scaled value.
The service da_add_request_name is called for both STATUS property (this
request is assigned handle[0]) and READING property (handle[1]).
After a call to da_process_request_wait has fetched database information,
and its success has been checked,
a pointer, here named ``dbscale_status_ptr'' or ``dbscale_analog_ptr,'' should be assigned to point to the SCALING
attribute's PDB.
        sts = da_get_db_ptr(&handle[0], DB_C_ATR_SCALING, &dbscale_status_ptr);
        	SIGNAL_FAILURE(sts);    /* Get pointer to scaling info  from DB */
        sts = da_get_db_ptr(&handle[1], DB_C_ATR_SCALING, &dbscale_analog_ptr);
        	SIGNAL_FAILURE(sts);    /* Get pointer to scaling info  from DB */
The call to da_get_data returns a status for the individual request
associated with a handle.
        sts = da_get_data(&handle[0], MAX_DAT_LENGTH, &data, &truelen, NARG, &seq);
        SIGNAL_FAILURE(sts);            /* Examine the data that's returned */
At this point we begin to scale the STATUS data. The raw data in ``data'' is
passed to routines which pluck out only a single bit of interest and place its
value in the integer ``yesno.'' The first
one is the ON/OFF STATUS bit:
	yesno = scl_is_on(&data, dbscale_status_ptr, &sts );
        SIGNAL_FAILURE(sts);            /* Scale data to check ON/OFF bit */
	printf("ON Status is: %d \n", yesno);
Similar scalings of the other ``generic'' STATUS bits follow.
Assuming raw data has been returned in an integer called ``data,'' that a
pointer called ``dbscale_analog_ptr'' points to the PDB delivered through the
call to da_get_db_ptr, and that ``units'' is a character array at least four
characters long, we can convert the raw numerical data to engineering units:
        value = scl_raw2eng(&data, dbscale_analog_ptr, &sts, units);
                                        /* Scale data to engineering units */
        printf("Scaled value is: %10.3g  %.4s\n", value, units);
Conversion to intermediate units is quite similar:
        value = scl_raw2iu(&data, dbscale_analog_ptr, &sts, units);
                                    /* Scale data to "intermediate" units */
        printf("Scaled value is: %10.3g  %.4s\n", value, units);
A Note on Settings
When one is setting rather than reading devices, the reverse transformation,
turning a floating-point value in intermediate
units into an integer raw-data value, is useful. It would look like this:
        data = scl_iu2raw(&value, dbscale_analog_ptr, &sts, units, NARG);
                    /* Send that floating-point data back to raw format */
The value ``data'' can now be passed to an EPICURE setting service.
/*  Program DA_SCALING_EXAMPLE.C           Bill Higgins  August 1989
  Example program  using scaling calls.  Very similar to DATA_ACQ_EXAMPLE.C.
Prints raw and scaled STATUS readback, and raw and scaled READING
readback, from device P00V.                 */
#include stdio                          /* Standard I/O                 */
#include descrip                        /* Descriptor file              */
#include "epicure_inc:ftd.h"            /* Time stamp structures        */
#include "epicure_inc:dbuser.h"         /* Database setup               */
#include "epicure_inc:daruser.h"        /* Data acquisition setup       */
extern float scl_raw2eng();             /* Scaling routines-- must be   */
extern float scl_raw2iu();              /*  declared floating point!!!  */
extern int scl_iu2raw();                /* This one's an integer        */
#define NARG  0                         /* No argument                  */
#define REQ_FTD FTD_K_IMMEDIATE 	/* The time we want data read: immediately! */
#define MAX_DAT_LENGTH 4                /* Maximum data length 4 bytes  */
#define MAX_DEV_CT 1                    /* Maximum of 1 device          */
#define SIGNAL_FAILURE(s)       if (!(s&1)) lib$signal(s)
static readonly $DESCRIPTOR(name_descr, "P00V");   /* Device name       */
struct DB_ANALOG_SCALING  *dbscale_analog_ptr; /* READING data scaling info from DB    */
struct DB_STATUS_SCALING  *dbscale_status_ptr; /* STATUS data scaling info from DB    */
int data;                               /* Data will be returned in an integer */

void data_here()                        /* This function will be called     */
{                                       /* when the data arrive. (Don't put */
        sys$wake(0, 0);                 /* any more processing in this function!) */
}                                       /* AST routine                  */

main()
{
        int i, sts, truelen, seq, handle[2];
        char units[5];                  /* Units string for scaling     */
        float value;                    /* Scaled value                 */
	int yesno;			/* Logical value                */
        sts = da_init();                /* da_init paves the way for all other da_ */
        SIGNAL_FAILURE(sts);            /* Error handling               */
        sts = da_add_request_name(&name_descr, DB_C_PRP_STATUS,
                NARG, &REQ_FTD, NARG, NARG, NARG, &handle[0]);
                                        /* Status of device is requested*/
        SIGNAL_FAILURE(sts);
        sts = da_add_request_name(&name_descr, DB_C_PRP_READING,
                NARG, &REQ_FTD, NARG, NARG, NARG, &handle[1]);
                                        /* Reading is requested         */
        sts = da_process_request_wait(data_here);
                                        /* Go process the list now      */
        if (sts != 1) {                 /* If not successful, check status of */
                SIGNAL_FAILURE(sts);    /* individual calls to da_add_request_name */
		for (i=0; i<2; i++){	/* by using handle.             */
	                sts = da_get_add_status(&handle[i]);
        	        SIGNAL_FAILURE(sts);    /* This tests that database access    */
                	}                       /* worked fine. */
                }			/* End of "if" */
        sts = da_get_db_ptr(&handle[0], DB_C_ATR_SCALING, &dbscale_status_ptr);
        	SIGNAL_FAILURE(sts);    /* Get pointer to scaling info  from DB */
        sts = da_get_db_ptr(&handle[1], DB_C_ATR_SCALING, &dbscale_analog_ptr);
        	SIGNAL_FAILURE(sts);    /* Get pointer to scaling info  from DB */
        sts = sys$hiber();              /* Sleep until the list is done */
        sts = da_get_data(&handle[0], MAX_DAT_LENGTH, &data, &truelen, NARG, &seq);
        SIGNAL_FAILURE(sts);            /* Examine the data that's returned */
        printf("Raw data value for status is: %d\n",  data);
                                        /* Now invoke scaling functions */
	yesno = scl_is_on(&data, dbscale_status_ptr, &sts );
        SIGNAL_FAILURE(sts);            /* Scale data to check ON/OFF bit */
	printf("ON Status is: %d \n", yesno);
	yesno = scl_is_ready(&data, dbscale_status_ptr, &sts );
        SIGNAL_FAILURE(sts);            /* Scale data to check READY/TRIPPED bit */
	printf("RDY Status is: %d \n", yesno);
	yesno = scl_is_remote(&data, dbscale_status_ptr, &sts );
        SIGNAL_FAILURE(sts);            /* Scale data to check REMOTE/LOCAL bit */
	printf("REM Status is: %d \n", yesno);
	yesno = scl_is_positive(&data, dbscale_status_ptr, &sts );
        SIGNAL_FAILURE(sts);            /* Scale data to check POS/NEG bit */
	printf("POL Status is: %d \n", yesno);
	yesno = scl_is_ramped(&data, dbscale_status_ptr, &sts );
        SIGNAL_FAILURE(sts);            /* Scale data to check RAMP/DC bit */
	printf("RAMP Status is: %d \n", yesno);
	/* Now go to work on the Reading data */
        sts = da_get_data(&handle[1], MAX_DAT_LENGTH, &data, &truelen, NARG, &seq);
        SIGNAL_FAILURE(sts);            /* Examine the data that's returned */
        printf("Raw data value for reading is: %d\n",  data);
        value = scl_raw2eng(&data, dbscale_analog_ptr, &sts, units);
                                        /* Scale data to engineering units */
        printf("Scaled value is: %10.3g  %.4s\n", value, units);
        value = scl_raw2iu(&data, dbscale_analog_ptr, &sts, units);
                                        /* Scale data to "intermediate" units */
        printf("Scaled value is: %10.3g  %.4s\n", value, units);
}
Timer Services
In order to perform actions at particular times in the accelerator cycle,
a set of EPICURE timer services is provided. They are listed in Table
.
The need to synchronize various computer programs to the accelerator
cycle is obvious.
The high-resolution timing desirable for the EPICURE data acquisition
subsystems makes use of multiple dedicated processors (data acquisition
engines) to perform timing and data communications. Other processors on the
network rely upon these data acquisition engines for all time-critical
processing.
In particular, the Data Acquisition
Requestor (DAR) process on each participating network node has
an interest in the accelerator clock in order to ``time-out'' a request.
It is highly desirable that the method of determining this
``time-out'' be independent of the data acquisition protocol (and hardware)
itself. Also, an independent means of verifying clock operation at the
application program level is a valuable diagnostic tool.
The EPICURE timer services serve as a timer
interface for programs anywhere in the network.
At the moment, their clock is the Timer hardware possessed by each front-end
node. As EPICURE grows, clock hardware may be added to other nodes to reduce
the amount of timer-service traffic.
Frequency-Time Descriptor (FTD)
The data acquisition system allows the specification of a sample time
within the accelerator cycle or an asynchronous periodic rate for each data
request. The Frequency-Time Descriptor (FTD) defines a uniform method of
specifying such a time or rate.
An FTD is defined to be a single 32-bit
longword divided into three fields: m, event, and interval. The m field
specifies the type of sample time: periodic rate (FTD_C_FREQ),
phase reversal
(sometimes known as ``T-time'') clock (FTD_C_PHICLK), or Tevatron clock (FTD_C_TEVCLK).
The event field specifies the number of the clock event:
1 through 15 for the phase reversal clock and 0 through 253 for the Tevatron
clock. The interval field specifies the rate interval in milliseconds for
a periodic event or a delay in milliseconds after a clock event.
The C language structure declaration FTD and the symbols for the m field are
included in the VAX file EPICURE_INC:FTD.H. Figure
gives a diagram
of this structure.

Timer Service Routines
The system timer service routines, listed in Table
are all functions and return a standard
status code as the function result as described in EPICURE Design Note 5
``System-Wide Status Codes And Error Reporting.''

Setting Services
To close a valve, or command a magnet's power supply to run at a desired
current, or move a target into a beam, EPICURE must perform a ``setting''
operation. You
set a device with a collection of EPICURELIB service routines that are close
relatives of the Data Acquisition routines discussed in Chapter
.
Setting requests, like reading requests, are managed
by the Data Requester Process (DAR). The Data Acquisition Server process
(DAS), which runs on a front-end node and coordinates the collection of data
for acquisition services, is also used by the setting services to coordinate
the setting operations.
Setting service routines all begin with the string ``ds_,'' and are described
briefly in Table
.
For more detail see the on-line help
files (FERMIHELP), described in Section
.

More about Setting Requests
A setting request must be on a list. This is in contrast to data
acquisition requests, which may be added to a list (using da_declare_list,
and specifying a list ID integer in da_add_request_name) or
may be stand-alone requests. An application program will declare a list, then
add one or more setting requests to the list. Each request will specify a
device, a list ID, and a Frequency-Time Descriptor (FTD).
Another difference between settings and data acquisition is that repetitive
FTD's (for example, ``read this device at 1 Hertz'')
and FTD's representing a
delay (for example, ``read this device at 2 seconds after clock event T5'')
are not allowed.
Each
request must specify a one-shot FTD.
The FTD will specify when the setting
is to be done.
(See section
for more on the Frequency-Time
Descriptor.)
Suppose a programmer wants a setting to be performed at a predetermined time.
FTD's can be used to delay the actual store in the hardware until a
particular time. In the case of a ramping magnet power supply, for instance,
you could load new ramp values after flattop has been reached in the current
accelerator cycle, so the new ramp values become active as a group with the
next cycle.
Calling Sequences for Setting Functions
The application program calls the following
sequence of functions to execute a device setting:
- Declare a list: ds_declare_list
- Add set request(s) to the list, using
ds_add_request_name, ds_add_request_prev, or
ds_add_request_di
- Gather necessary information from the database,
using either ds_db_access_wait or
ds_db_access_nowait
- Scale the setting value desired from engineering units into raw data
units
- Put the ``set to'' data in the request(s): ds_put_data
- Execute the list: ds_execute_list
- Read the device's setting to verify that the setting operation
was successful (see Chapter
)
The first three steps gather the necessary information from
the database and set up the necessary data structures
for the list. The information and structures associated
with a request stay around until the user explicitly deletes a
request (using ds_delete_request) or the list on which it resides.
This reduces the overhead involved in setting up repeated requests.
The fourth through seventh
steps can be repeated as often as desired.
Completion Status
Setting service routines return a longword error and
completion status in the standard EPICURE status format. See
EPICURE Design Note 5, ``System-Wide Status Code and Error
Conventions,'' for more details.
Also see Section
in this manual.
Settings and Device Protection
EPICURE checks user privileges against the Device Database to ensure that the
process requesting a setting or reading is allowed to perform one. If the
device-protection check fails, an error condition will be generated. For more
details, see EPICURE Design Note 72, ``Device Protection in the EPICURE
Control System,'' by
Dambik, Nagy, Watts, and West.
Example Program
The example program SETTING_EXAMPLE.C performs a simple setting operation on the device
NW7W
. It is found in the file
WARNER::EPICURE_EXAMPLES:SETTING\_EXAMPLE.C
Shortcuts
SETTING_EXAMPLE.C, because it is a simplified example, cuts a few corners
compared to a complete, well-designed setting program.
- This program does not
read the setting to confirm that its setting operation has been a success,
though this would be good practice. Such a check can easily be implemented by
adding calls to the appropriate data acquisition (``da_*'') services,
requesting a reading of the DB_C_PRP_SETTING property. We encourage the
reader to try this modification as an exercise. Use the program
DATA_ACQUISITION_EXAMPLE, described in Section
, as a guide.
- The first function defined, set_completed(), contains only a call to the
SYS$WAKE service. This is the AST routine which will be triggered when the
setting request completes. (This is a simple example program, and it uses an
unsophisticated way to cause an interrupt.
You shouldn't use SYS$HIBER and
SYS$WAKE if you have multiple reasons for invoking interrupts; in that case,
you should use the event-queue technique described in Section
,
``Using Event Queues: The EVTQ Services.'')
- Another shortcut SETTING_EXAMPLE.C takes is in the use of the SIGNAL_FAILURE()
macro,
which calls the LIB$SIGNAL service, to signal errors. This is satisfactory,
but in some cases it may be better to use a more complicated method.
For more depth on the
understanding and use of error messages, see chapter
.
What SETTING_EXAMPLE.C Does
In the main() function,
the floating-point variable ``value'' is initialized to the desired current.
After initialization of the setting routines, a list is declared, with the
name of the AST routine, set_completed(), in its call. Then a request to set
the DB_C_PRP_SETTING property is added to the list. A call to
ds_db_access_wait() fetches database information and verifies that the
setting request is valid-the device exists, it is settable, and so forth.
When the database access is complete, a pointer to the scaling information is
set up, and then ``value'' is scaled from a floating-point number into an
appropriate raw-data form, which is placed into the variable ``data.'' This
can now be fed to the setting operation by a call to ds_put_data(). As yet no
setting has been performed; only when the list is executed does the program
send the setting-request list off to a front end node. It then hibernates
until the list execution is complete.
Once the program awakens, the first order of business is to check the status of
each individual request on the list, one per handle, by calling
ds_get_status().
The timestamp returned by the call
to ds_get_status() is translated (feeding it to the library routine
LIB_CVT_LT_STR) and printed out to
show the exact time at which the setting request was executed, and the exact
delay after T5. (You may find
this technique
a useful diagnostic for some applications you develop. If you're not interested in the
timestamp, a null (zero) argument may be placed in this call.)
SETTING_EXAMPLE.C then exits.
Each call to an EPICURE service is followed by a call to SIGNAL_FAILURE, which
prints out a condition message if the status returned by the service is
questionable. In severe cases SIGNAL_FAILURE will halt the execution of the
program.
/* Program SETTING_EXAMPLE.C Bill Higgins 27 July 1989
Example program to demonstrate settings. Sets device NW7W to 1. */
Also converts and prints timestamp returned by setting operation. */
#include stdio /* Standard I/O (see NOTE 2) */
#include descrip /* Descriptor file */
#include "epicure_inc:ftd.h" /* Time stamp structures */
#include "epicure_inc:dbuser.h" /* Database setup */
#include "epicure_inc:daruser.h" /* Data acquisition setup */
#define NARG 0 /* No argument */
#define SIGNAL_FAILURE(s) if (s != 1) lib$signal(s)
int set_completed() {
sys$wake(0, 0); /* Called when the list completes */
}
int main(){
int handle, data = 0, sts = 0, list_id = 1, timestamp[2];
float value = 1.0; /* Set current to this value */
char time[29], name[] = {"NW7W"}; /* NW7W is the dummy device */
$DESCRIPTOR(name_d, name); /* Create name descriptor */
$DESCRIPTOR(time_d, time); /* Descriptor to hold timestamp string */
struct FTD user_ftd; /* Structure to hold FTD value */
struct DB_ANALOG_SCALING *dbscale_ptr; /* Data scaling info from Database */
name_d.dsc$w_length = strlen(name); /* Give descriptor proper length */
user_ftd.m = FTD_C_PHICLK; /* Set type for phase clock T-time */
user_ftd.event = 5; /* Set event = T5 */
user_ftd.interval = 3000; /* Set delay = 3000 msec */
sts = ds_init(); /* ds_init paves the way for all other da_ */
SIGNAL_FAILURE(sts);
sts = ds_declare_list(list_id, NARG, set_completed);
SIGNAL_FAILURE(sts);
sts = ds_add_request_name(&name_d, DB_C_PRP_SETTING,
NARG, &user_ftd, list_id, &handle);
SIGNAL_FAILURE(sts);
sts = ds_db_access_wait(); /* Access database to fetch info */
SIGNAL_FAILURE(sts);
sts = ds_get_db_ptr(&handle, DB_C_ATR_SCALING, &dbscale_ptr);
SIGNAL_FAILURE(sts); /* Get pointer to scaling info */
data = scl_eng2raw(&value,dbscale_ptr,&sts,NARG,NARG); /* Scale value */
SIGNAL_FAILURE(sts);
sts = ds_put_data(&handle, &data , NARG, NARG);
SIGNAL_FAILURE(sts);
sts = ds_execute_list(list_id);
SIGNAL_FAILURE(sts);
sts = sys$hiber(); /* Sleep until front end returns data */
sts = ds_get_status(&handle, timestamp); /* Get the completion status */
SIGNAL_FAILURE(sts); /* and optional timestamp */
sts = LIB_CVT_LT_STR(×tamp, &time_d, 1);
SIGNAL_FAILURE(sts); /* Convert timestamp[0] to string */
printf("Setting completed with Timestamp: %.*s\n %f seconds into cycle.\n",
time_d.dsc$w_length, time_d.dsc$a_pointer, ((float)timestamp[1])/1000000.);
}
Setting the CONTROL Property
Setting ``Generic'' CONTROL Bits
Setting one of the Boolean CONTROL bits, such as ON/OFF, POS/NEG, or RAMP/DC, is
a little trickier than setting a numerical value. It is necessary to choose the
right numerical value corresponding to the bit of interest-these are defined
in EPICURE_INC:DBUSER.H---and to translate it into raw data format. The
raw data value can then be fed to the ds_put_data service and treated like
any other setting value.
Recall from ``Scaling STATUS and CONTROL Values,'' Section
, that
there are a number of special bits designated as ``generic'' CONTROL
bits.
They are given in Table
.
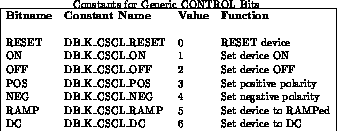
The translation should be done using the scaling routine
scl_get_control_data.
According to the documentation on this service, it returns an unsigned
integer.
For example, suppose you wish to
set a device to positive polarity.
#include "epicure_inc:dbuser.h"
struct DB_CONTROL_SCALING bpdb;         /* Boolean Process Data Block */
unsigned int bdata;     /* Scaled data for Boolean (CONTROL) stuff must be unsigned*/
int data, handle, value_num, sts;
(We assume that the usual sequence of calls to set a device has been invoked
here, and we are just about to call ds_put_data.)
Assign the appropriate constant
DB_K_CSCL_POS to the integer ``value_num.'' Then feed ``value_num'' to the
scaling routine to yield the correct raw-data value.
value_num = DB_K_CSCL_POS   ;   /* Set positive polarity */
/* Now scale value_num into proper data format */
bdata = scl_get_control_data(&bpdb, &sts, &value_num, 0);
data = bdata;   /* Assign value of unsigned "bdata" to */
                /* signed int "data"                   */
sts = ds_put_data(&handle, &data, NARG, NARG);
Status returned by EPICURE services should be checked, of course. At this
point the program is ready to call ds_execute_list.
Setting Device-Specific CONTROL Bits
Setting CONTROL bits which are not generic is a more involved process. Talk
with EPICURE consultants if you need to do this.
Status Codes and Error Messages
Status Seeking
Many EPICURE Service and VMS service calls return a 32-bit integer, called
the ``Condition Code,'' which
indicates the success or failure of the call and can give the programmer
useful diagnostic information.
If the call is successful, the condition code integer is odd.
In other words, the least significant bit of the condition code, Bit 0, denotes
success (1) or failure (0). Bits 1 and 2 give ``severity'' information,
which distinguish degrees of success or failure:

The system-wide condition code value has other fields which identify the
``facility'' (VMS or EPICURE software subsystem) which produced an error,
and the particular nature of the error. This structure will not be discussed
here; the curious reader should consult the
VAX/VMS Run-Time Library Routines Reference Manual chapter on
``Condition Handling Procedures.''
Authors of EPICURE programs are strongly encouraged to check the status
of calls wherever possible, and to take appropriate action when an error
is encountered.
Checking Status in Your Programs
The simplest method for status checking is to test the condition value to
see if it's odd (its least significant bit is 1). If not, a call to the
run-time library routine LIB$SIGNAL will elicit a message explaining the
failure. If the failure is ``severe,'' LIB$SIGNAL will halt execution
of the program; if not, the program will continue after reporting the error.
This behavior may be unfortunate if a severe error in the function call
doesn't imply that your entire program should stop.
The examples in chapter
, ``Writing an Application:
Two Examples,'' employ LIB$SIGNAL to
signal errors.
To avoid LIB$SIGNAL's crashing your program, you can check the status yourself
and obtain message strings by calling SYS$GETMSG. You should then mask
off the
success/severity bits, bits 0-2 of the condition code, and test them. If
these bits are not zero (representing unqualified success), you will want
to fetch the message string associated with the condition code.
STATUSCHECK.C : A Small Example
The program STATUSCHECK.C is intended to demonstrate methods of checking
status and dealing with condition-code messages. It deliberately causes errors
in da_process_request_wait and da_get_add_status by requesting data from
a nonexistent device named, naturally, BOGUS_DEVICE. These EPICURE services
thus return status values representing problems with the request.
check_status: This is used to check the status of most calls in the
``main'' function. Given the condition-code integer value, it first checks to
see if the condition is ``normal completion'' (value of 1). If not, it calls
the VMS system service SYS$GETMSG. This service places the message text
associated with that condition into a string descriptor, msg_d. Note that
SYS$GETMSG itself returns a status, which is placed in status2 and which
is tested for the value SS$_MSGNOTFND. This is the condition returned when
no translation of ``status'' is found in the message lookup table. In this
case the value of ``status'' is translated into a string and placed in ``msg''
(the string pointer part of msg_d).
The message string msg is then null-terminated after its last character,
unless it's longer than 80 characters, in which case it's truncated by
null-terminating it to 80.
Then the message is output to the screen using ``printf.'' (Programmers
using EPICURE Screen Management (ESM) services to handle their output might
devise a more elegant way of getting the message to the screen, such as
passing the message descriptor from the status-checking function to a
screen-output function.)
data_here: This is a dummy function that does nothing. It is the AST
routine associated with da_process_request_wait. Ordinarily this would
place an event on the event queue or wake up a hibernating routine.
main: The main function calls da_init and da_add_request name, calling
check_status upon each return. Both of these routines complete successfully.
The trouble comes when we try to process the request list: the BOGUS_DEVICE
triggers an error, and check_status tells us:
%DAR-W-BADADDS, Some or all adds returned bad status.
To investigate which ``add'' returned a bad status, and why,
we have to feed the
individual handles of our requests to da_get_add_status. In this case
we have only one request and one handle. (A more complicated program might
have to step through an array of handles.) Now check_status informs us:
%DB-W-NODEVICE, no such device
At this point, I've inserted a SIGNAL_FAILURE macro, which invokes LIB$SIGNAL
if the status is odd. This produces the same error message as check_status,
but it also halts execution, creating a TRACE stack dump as it exits. The
disadvantage of using LIB$SIGNAL here is that a failure to access just
one device will prove fatal to the entire program. If an author wants an
application to be more robust, he must use another method to report error
conditions.
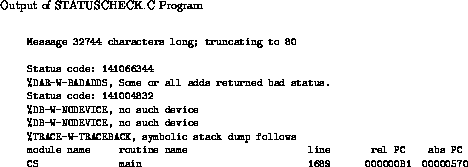
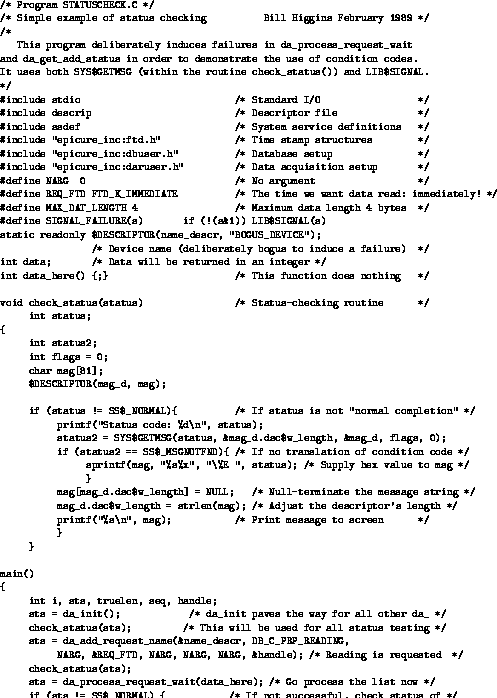
Some Useful Tricks
If you encounter an error
message when running an application, and you wish to report a problem to
the programmer or to the EPICURE System Manager, note the short error code
(the % sign followed by capital letters, as in
`` %DIRECT-W-NOFILES'') and the longer
explanatory message, such as `` no files found.'' These
are extremely useful to programmers in troubleshooting.
The Debugger command examine/condition will display the error message
associated with a condition-code integer.
If you are using the PAGE application, only abbreviated versions of messages
will appear when an error is encountered. Pressing ``Control-E'' (for
``Expand'') will create a window where the full descriptive text of these
messages are displayed.
Advanced Topics
Very adventuresome programmers might want to create their own status
conditions and message strings by creating a .MSG source file. Reading
Epicure Design Note 5, ``System-Wide Status Codes and Error Reporting,''
should help you puzzle out how to do this.
Typically this is not done by application programmers!
Another advanced topic is writing your own ``condition handler,'' a routine
which intercepts errors and deals with them before the VMS system routines see
them. This is dealt with in the VAX/VMS Run-Time Library Routines
Reference Manual or VMS RTL Library (LIB$) Manual chapter on
``Condition Handling Procedures.''
EPICURE Screen Management: What the User Sees
EPICURE applications employ a common ``look'' in presenting information
to the user and in providing him with methods for communicating his desires
to the control system. There are strong reasons for this.
First, a user unfamiliar with an application will nevertheless find many
familiar features. Title and main menu choices are in a common location. The
methods for choosing menu items, and in picking items from secondary pulldown
menus, are uniform. Cursor movement around the screen is always controlled
with the same keys. Exiting from the program is the same process for all
applications. These common features will make a new application both easier to
use and faster to learn.
Second, both the inexperienced user and the old hand benefit from
a clear and familiar standard interface. At each stage of the application
program's operation, the set of choices available should be clear. If the
application programmer has done good design work, the user will
not have to recall a complicated set of commands but will instead find his
options and his decision information before his eyes. This eases the burden
of keeping the program's complexity in mind; the complexity is suitably
organized into menu choices, regions on the screen, audible signals, and
so forth. Even an expert user, to whom the ease of learning the application
is no longer important, will appreciate having options displayed
on the screen rather
than keeping them memorized in the brain.
This places a responsibility on the author of an application program.
The author must keep awareness of good design principles in mind during
development, and strive to apply them.
The author must also adhere to the conventions of the standard user interface,
so that such standard keys as the RETURN key or the Control-Z key have the
same functions as in other EPICURE applications the user may be familiar
with.
The standard features of EPICURE applications are a framework for the
application programmer to fill out. A clear advantage in this is that service
routines handle the burden of screen management, menu creation, real-time event
management, and so forth. And the benefits of giving users a familiar
interface have already been discussed. On the other hand, the standard
``skeleton'' does constrain the programmer's design choices to some extent.
The EPICURE developers believe that the advantages greatly
outweigh the disadvantages.
Developing Your Own Application Programs
- Before you write any code at all, decide what the major functions of the
program should be and how a user will invoke them. Design the screen display
on paper.
- Write a ``Design Note'' which explains these features. Discussions
with potential users and with EPICURE experts can help clarify your design
before you have invested much time in writing it. (Perhaps someone else has written subroutines you'll find
useful.)
- Break the problem of creating the program into smaller pieces, and write
it in modules.
- Comment clearly and extensively. Others may want to read your code to
understand, maintain, or modify it. Even if this is not the case, you
may be called upon to make a change in it a year or two from now. Will you
still remember what all the routines do? Don't take a chance!
- Test the program as thoroughly as you can.
- When you are ready to release it, prepare a Software Release Note to
serve as a user's guide. This may be very similar to your Design Note, but the
emphasis should be on the function and user interface of the application,
rather than on explaining its inner workings.
Trying out ESM_DEMO: An Example
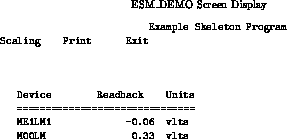
Many of the ideas in this chapter will be illustrated by referring to an
example program called ESM_DEMO. Take a walking tour of this demonstration
and become
familiar with its features.
To begin, copy the source code from the EPICURE_EXAMPLES directory to your own:
COPY/LOG EPICURE_EXAMPLES:ESM_DEMO.C *
Then compile and link the program:
CC ESM_DEMO

LINK ESM_DEMO,RDCS$LIB:EPICURELINK/OPTIONS
Now run the program by typing:
RUN EPICURE_EXAMPLES:ESM_DEMO
The screen display will resemble figure
.
A title bar appears at the top of the screen with the words ``Example Skeleton
Program.'' Immediately beneath it is the ``menu bar,'' which presents the
major options avaliable: Scaling, Print, and Exit. These two bars will remain
on the screen throughout the operation of the ESM_DEMO program.
The remaining area, referred
to as the ``work area,'' occupies 22 lines of screen space. The cursor can
be moved around this region using the arrow keys
( and
and
 ). In this region there
is a header which reads ``Device/Readback/Units,'' a row of = signs below
that, and two rows of underscores(_). These rows indicate the two fields
on the screen where the user may type input.
). In this region there
is a header which reads ``Device/Readback/Units,'' a row of = signs below
that, and two rows of underscores(_). These rows indicate the two fields
on the screen where the user may type input.
At startup the cursor is positioned in the first column of the first field.
Type the name of an EPICURE device, such as the beam loss monitor ME1LM1.
Then hit the RETURN key.
The device name is suddenly rendered into boldface capital letters. You should
see numbers appear in the Readback field, and units displayed in the Units
field. (If there is a problem, an error message may be displayed in the
``error zone'' at the bottom of the screen, or in the Readback field.) The
numbers should update every few seconds as new data requests are returned from
the front ends.
Move the cursor, using the arrow keys, to the first position in the second
row of underscores. Type the name of another device, such as M00LM. Its
readback and units should also appear on the display.
Move the cursor over to the Units field of this row. Try typing some
characters. Notice that the program refuses to echo your characters to
the screen, even when you hit RETURN, while the cursor is not in the Names
field. The Names field is the only one of the three fields where the program
responds to your keyboard input.
Move back to the Names field and play around. Use different device names,
or type characters in various positions. Note that:
- The program doesn't work properly unless you begin your device name
in the first column of the Names field.
- If you try to begin your name anywhere else, ESM_DEMO will soak up all
characters
in the field beginning with the first column and ending wherever the cursor
is when you hit RETURN.
- The DELETE key doesn't work.
These features (or are they bugs?) are peculiar to the ESM_DEMO program,
and are not endemic to the ESM interface. All of them could be changed
by making some changes to ESM_DEMO.
You might try typing the name of a nonexistent device into the Device field.
This should produce errors as EPICURE fails to recognize the device. If these
errors are associated with a particular device, they generate a one-word
message which appears in the Readback field on that devices line. If they are
more general errors, they give rise to
informative messages which appear near the bottom of the
screen. Since there is a limited amount of space, new error messages can
overwrite old ones in the ``error zone.''
Now try choosing some options from the menu bar. Press the DO key at the top
of your keyboard. The cursor moves to the first choice in the menu bar,
``Scaling.'' The word is also highlighted in reverse video.
To choose Scaling, press the RETURN key. This causes a small
vertically stacked menu, called a ``pulldown menu,'' to appear just below the
word ``Scaling.'' To the eye of the user, this positioning associates the
three choices with Scaling in a clear way.
Use the up and down arrows to move
within the pulldown menu among the options, Raw, Intermediate, and Engineering.
These represent the three available flavors of scaling: raw unscaled bits just
as they come back from the device, intermediate units (usually used for
troubleshooting hardware), and engineering units (the default; you've already
got engineering units showing on your screen). As you move to a new option
it is displayed in reverse video, so it contrasts with the color of the
other two.
To choose one of these, say Raw, put the cursor over Raw and press RETURN
again. This is the standard means of choosing from a menu. You should
see the Units string change from ``volts'' to ``hex,'' and the next update
of the Readback values will display hexadecimal digits representing the
raw data.
What if you
don't want to take any of the choices offered in a menu? Press DO again. Place
the cursor on the ``Scaling'' option and press RETURN. The
Raw/Intermediate/Engineering menu will again appear. You can leave this menu
without making a choice by pressing Control-Z. The cursor is returned to the
work area (the state the program was in before you pressed DO). In general this
works for menus at any level of an application. If you are in the work area,
not in a menu, and you press Control-Z, the application
program will terminate execution. So it is a quick way to exit the program
without choosing the ``Exit'' option from the menu bar. (The F10 function
key performs the same function as Control-Z.)
You might wish to view the reading from another device. Position the cursor
on the first column in one Names field and type the name of a different
device, such as the Meson loss monitor ME2LBP1. The new device will replace
the name of the old device in boldface, and its new readback and units will
appear in the appropriate fields.
Press the DO key again. Use the left or right arrows to move over to
``Print.'' Press RETURN to choose the Print option.
A ``dialog box'' will appear, saying ``PLEASE WAIT, COLLECTING PRINT QUEUE
NAMES.'' After a few seconds a pulldown menu listing the printer queues as
its options will appear. Use the arrows to move to your favorite printer, then
press RETURN to pick it. An image of the screen will be routed to the printer.
If you don't want to make a hard copy after all, choose the ``Exit'' option and
the menu will disappear. The cursor will be returned to the spot where it was
before you pressed DO. (The ``Print'' option is friendly. The next time you
choose ``Print,'' it will remember which printer is your favorite, and start
off with that one as the default menu choice.)
Speaking of exiting, you can leave the ESM_DEMO application by pressing DO,
moving to the ``Exit'' choice on the menu bar, and hitting RETURN.
If the cursor is in the work area and not in a menu, hitting Control-Z will
also exit the program. In this case, a dialog box will appear, asking ``
Do you really want to exit? Y''
If you hit RETURN here, the program will exit, because it assumes you are happy
with the default choice (``Y'') it offers you. If you don't want to exit, hit
the left-arrow key (
 ) to move the cursor one space to t he left,
positioning it over the capital Y. Then type ``N.'' This will cause the
dialog box to disappear, and the program will resume as if you'd never asked to
exit. (It's looking for a single-character string in that spot where the ``Y''
is sitting. Any character other than a ``Y'' will cancel the request to exit.
Hitting a key while the cursor is not over the ``Y'' spot causes ESM_DEMO to
pick up the ``Y'' and assume you really wanted to exit.)
) to move the cursor one space to t he left,
positioning it over the capital Y. Then type ``N.'' This will cause the
dialog box to disappear, and the program will resume as if you'd never asked to
exit. (It's looking for a single-character string in that spot where the ``Y''
is sitting. Any character other than a ``Y'' will cancel the request to exit.
Hitting a key while the cursor is not over the ``Y'' spot causes ESM_DEMO to
pick up the ``Y'' and assume you really wanted to exit.)
Now that you are familiar with the features of ESM_DEMO, you may be ready
to take a close look at how its pieces fit together.
The ESM Routines
The EPICURE Screen Management
routines are found in WARNER::RDCS$LIB:EPICURELIB.OLB. On-line
documentation for them can be obtained by typing
FERMIHELP EPICURELIB ESM_ routine_name
Recall that paper documentation (including the manual you're reading)
is suspect-it may be out
of date! Changes and additions to the ESM routines will be documented in the
on-line HELP library. The set of ESM calls, as of this writing, is
summarized in Table
.
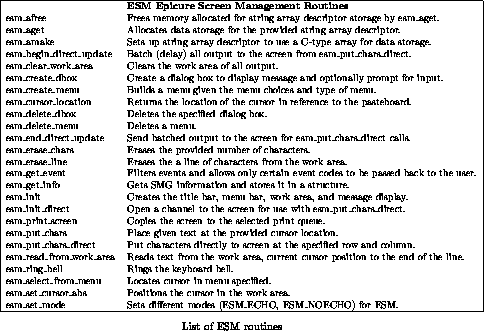
ESM offers a bewildering array of routines from which to choose. To help you
sort out which ones to use for a particular task, in
Table
they
are grouped by general function.
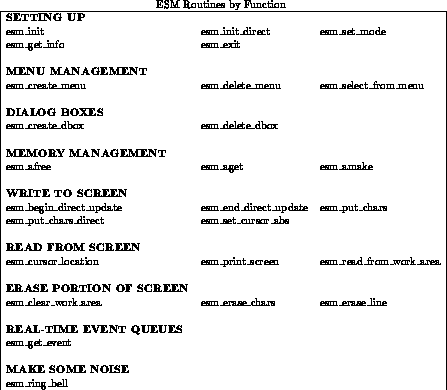
Standard Features of the EPICURE Skeleton Application
ESM services can handle keyboard input and perform several important
functions without making a lot of work for the programmer. Certain keys
will always do the same jobs in an ESM-using application. Certain features
of the screen format are standard, too.
Standard Key Functions
- Do
- Places cursor on menu bar.
- Arrow Keys:
 and
and
- Moves
cursor around screen, or between various options if cursor is within a menu.
- Return
- Within menu, causes the option the cursor is on to be selected.
In the work area, can (at programmer's option) initiate an action.
- Control-Z or F10
- Leave current menu without choosing any option,
and return to the work area. If cursor is not within a menu, these keys
exit the program.
- Control-W
- Refresh screen, rewriting all characters drawn with ESM
routines.
- Control-H
- Place cursor in first column of current line.
Standard Screen Features
- Title Bar
- Top line of screen, which will always give a centered title
for the application. The title is specified by giving a string descriptor
to the routine esm_init().
- Menu Bar
- Second line of screen; a reversed-video line which gives
the options available. These options always include ``Print'' and ``Exit.''
The options are elements in an array descriptor specified in a call to the
routine esm_init().
The cursor cannot move into the menu bar unless the DO key is pressed. Using
the arrow keys within the menu bar moves the cursor one field per keystroke,
so it lands on the next option, not on the next character.
- Work Area
- All lines below the second, which will have a format
determined by the application programmer.
- Pulldown Menus
- Menus of options that appear when an option is selected
from a previous menu. Pulldown menus should appear just under the text of the
item they were chosen from. Think of them as window-shades, which unroll
downward when you open them. These menus
are created by a call to
esm_create_menu().
Menus can have items stacked vertically or horizontally. The menu bar is an
example of a horizontally stacked menu. The menu which ESM_DEMO displays
when Scaling is
chosen is vertically stacked.
- Popup Menus
- Menus which appear anywhere on the screen. They are
distinguished from pulldown menus because they aren't necessarily ``suspended''
from a menu above them. Both popup and pulldown menus are created with the
esm_create_menu service; the programmer is responsible for arranging their
location so that they conform to the popup style or the pulldown style.
- Dialog Boxes
- Boxes which appear on the screen, overwriting existing text
in the work area, to get the user's attention and provide an informative
message. The esm_create_dbox() function manages these, and also allows for
user prompts and simple user input to be handled within a dialog box.
A Guide to Style
Much of the effectiveness of your program depends upon good user-interface
design. The ideal philosophy is to make EPICURE disappear-the user can forget
about the details of EPICURE, of the Vax, or of the terminal, and think
only about the beams and devices he's controlling.
In contemplating, and then implementing, your design, keep the
following tips in mind.
- Present options clearly. The question ``What can I do next?''
should always have an obvious answer. The new user will find the next step
laid out before her; the expert will be glad of a reminder.
- Present the results of actions clearly. When your user commands an
action, the display should change to indicate that something has been done. For
example, a plain-text string could change to boldface or reverse video, or the
cursor might move to a different field in the work area. This gives feedback
that tells the user the program is really accomplishing something. (But avoid
the temptation to beep or use blinking video; see Section
.)
- Organize your space well. Group together items which are related.
Separate unrelated items in distinct parts of the work area. Avoid a crowded
display with too much information and too little white space. Reading long
tables of numbers crammed tightly together is fatiguing, and can easily lead
to operator mistakes.
- Avoid other sources of mistakes. Don't put a menu choice that's
destructive (such as one that deletes a file) right next to a choice that's
frequently used. Minimize the number of destructive or irreversible actions.
Forcing the user to take a confirming action (``Are you sure you want to
do this?'') is usually not very effective, but is one way to slow down a little
and make him think. One way to implement this is to put a reverse-video
CAUTION box in the upper right-hand corner, and require the user to move the
cursor there and hit RETURN in order to complete the action. Dialog boxes are
a more sophisticated approach to this. Passwords are another mechanism for
restricting dangerous actions.
- Construct natural ``mappings:'' The spatial or temporal order of items
in your program should correspond to order that exists in the real world. For
instance, a list of beamline devices or enclosures could progress from upstream
to downstream as you read from top to bottom on your screen, or from left to
right. Use natural units as much as possible: a motor controller should read
out in degrees of rotation or centimeters of position, not in motor steps.
(Units such as motor steps can still be useful in debugging and engineering;
you can make them available with alternative scaling choices.)
- The option names in menus should be
verbs, not nouns, as much as possible. The user should be telling EPICURE to
``do something,'' so the list of options should be actions the user can take.
This is especially true in the main
menu bar.
- Put the most important data where it will get noticed most easily-at
the top
of the work area, or at the left-hand edge, or at the beginning of a column.
Observe the layout of the PAGE utility: The leftmost item is the Device Name,
which is the most important piece of information. As your eye scans to the
right, it next encounters the Setting and Readback values, which are the ones
you need most often. Following that are Units, Status, and descriptive Text,
which you consult less frequently. PAGE is organized so the data you are most
likely to need are quick to find.
- Some actions should be done in the work area (perhaps using a field-map
scheme, as in Section
), some should be done by picking from a
menu. If an action is to be done very frequently, don't put it in a menu;
instead make it easily accessible in the work area. Major modes of the program
should be easily accessible (either in the menu or in the work area), and the
most critical information (such as currently selected settings) should be
clearly presented. Menus are best at presenting ``decision trees,'' families
of branching alternatives to choose from.
- It's okay to have more than one method of doing something. Some actions
may warrant both a menu option and a field map option. One example in
the PAGE application is that the user may type a page name in the field in the
upper-left-hand corner. Or, by pressing the F17 key, a menu may be called up
displaying all existing page names, and a page may be picked from this menu.
- Don't make menus too deep. If one must plunge through several levels of
menus to reach a proper action, using the application quickly becomes tiresome.
Remember playing videogames, back in the early Eighties? Remember how you
would get all the way down to the fifth level of the dungeon, and then an ogre
would clobber you, and your guy would die, and you'd find yourself back on the
first level, having to do it all over again? That's what it's like when you
have too many nested menus.
Video Attributes
Text characters can be placed on the screen by calling the service
esm_put_chars(). One of the parameters of this routine is the ``video
attribute,'' the form in which the characters are called on the screen.
These attributes are specified by constants defined in SYS$LIBRARY:SMGDEF.H.
They are:
- SMG$M_BLINK
- Blinking text. Use extremely sparingly, because
it can be very distracting or even annoying to the user.
- SMG$M_BOLD
- Boldface text. A good choice for highlighting important
changes or options.
- SMG$M_REVERSE
- Reversed-video text (the foreground color becomes the
background and the background color becomes the foreground).
- SMG$M_UNDERLINE
- Underlined text.
There is no special attribute value for plain, ordinary, unblinking, unreversed
text; to render this, just specify NULL or 0 in the argument to
esm_put_chars().
Virtual Memory Management
The memory-management routines,
esm_afree, esm_aget, and esm_amake, are not used in the ESM_DEMO example,
but EPICURE consultants are willing to discuss their use. They are handy, for
instance, in creating a menu with a varying number of items (like print queues
or file names).
How to Make Your Users Happy
A satisfied user is a joy forever. To satisfy one you must not only follow
principles of good design such as those above, but also avoid annoying or
tiresome behavior.
Avoid the use of the terminal bell or ``beep.''
The beep is not personal-everybody in the control room or portakamp, not just
the program's user, hears it. This is annoying to the others, and can be
confusing as everybody scrambles to figure out which of many terminals just
beeped. It's better not to use at all.
Blinking text is useful, because it really stands out from the rest of your
screen display. Unfortunately it stands out too well, and can become
distracting. Worst of all is to have more than one item on the screen in
blinking text-to which of them is your attention supposed to be drawn? Be
very conservative in using blinking text.
Keep your screen layout uncrowded. This is less demanding on the user's eyes,
and helps avoid mistakes.
Document your program well. You will write a guide (a Software Release Note)
to explain how to use it;
try to cover all reasonable situations and anticipate questions. Remember that
what's obvious to you about the program may not be at all obvious to somebody
encountering it for the first time.
Using Event Queues: The EVTQ Services
In a real-time system such as EPICURE, a programmer often must deal with
a variety of different types of asynchronous events. One example is the
keystroke; a user may hit any key on the keyboard, at any random time.
Another is the return of data from a beamline device; nobody can predict
the exact time delay between a request for data and its arrival.
In the face of multiple event types, the simple mechanisms we used in Chapter
, ``Writing an Application: Two Examples,'' are
inadequate. They used the VMS system services SYS$HIBER and SYS$WAKE. A
more sophisticated scheme, which can distinguish a large number of different
event types, is appropriate. This is the ``event queue'' mechanism.
The application program, with the help of certain EVTQ routines, maintains a
queue where new events wait in line for attention. Each type of event has
associated with it an AST (Asynchronous Trap) routine that is called when the
event occurs. The AST does nothing more than set an integer value to
identify its event type, and add the new event to the queue. Then it exits.
A continuously cycling loop elsewhere within the application looks for new
events. When it finds one it processes the event, comparing its event-type
integer and choosing the appropriate course of action for that event. Then the
program returns to the loop, servicing the next event in the queue. If the
queue is empty, the program ``hibernates'' until another event comes in.
The EVTQ services available are summarized in Figure
.
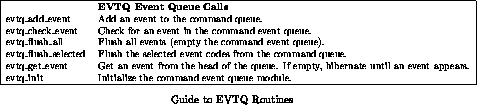
Implementing ``Field Maps''
When ESM creates a main menu bar and title in a standard application, they
only take up two lines of text. Most of the screen-22 rows by 80
columns-is available to the application programmer as a ``work area.''
This leads to the question of how best to use this area.
A solution favored by many
EPICURE application programmers is to set up a ``field map.'' This is an
array of structures which define particular areas of the screen as having
particular meanings. In the case of ESM_DEMO, there are Name, Readback,
and Device fields defined in each of two rows-a total of six fields. For
each field, a field map structure holds its row and column position on the
screen, its length, the number of blank spaces to leave between this field
and the next, and a ``protection'' value to indicate whether the field may
be altered by the user and what kind of data it takes.
The field is thus a well-defined, fixed-length region in the work area where
a specified type of information (such as setting, readback, status, or
comments) will appear. The user may or may not be allowed to modify it
by typing new characters in the field; perhaps it will be updated only
automatically, or not updated at all.
Let's look at what happens when the user hits the RETURN key. The interrupt
event thus generated goes into the event queue. Noticing an event in the
queue, the program wakes up and starts the key-processing routines.
The program, given the cursor's current row and column, steps through the array
of field maps, subjecting each field to a series of tests. Is its row the same
as the current row? If so, is the current column somewhere between the first
column and last column of the field? If so, is the user permitted to write
into the field, according to the protection value?
If all these conditions are satisfied, the input string is echoed to the
screen. The string is assumed to start at the first character of the field
and to end at the location of the cursor when the ``Return'' key was struck.
The string is also passed to other routines
(such as add_device()) for further processing.
ESM_DEMO is written to make the field map flexible and easily expandable.
To do this an ``end'' element is the last element of the field map array.
Consult the comments in the ESM_DEMO.H header file for a complete discussion.
What to Do with Error Messages
In ESM_DEMO the routine indicate_err() checks a status integer and writes an
message to an appropriate place in the work area if the status is abnormal.
There are all kinds of ways a programmer could have implemented this function;
in this case, the messages are written in two kinds of places.
First, if the message is associated with a particular device (examples: device
doesn't exist, front end is unreachable, the link has timed out) the short
version of the error message is written in the Readback field on that device's
line. The design idea here is to associate the position of a message on the
screen with the device responsible for it. This makes it easier for the user to
sort out the reasons for error messages. In order to accomplish this, the
program passes indicate_err() the row, column, and length of this field as
stored in the field-map structure.
Next, if the message is not associated with a device, a full long version of
the message is written, to an ``error zone,'' a single line near the bottom of
the screen.
A better way to handle condition messages might be associated with a particular
device might be to write longer versions of them to a field on that device's
line (starting in about column 35). The long error messages would be more
informative to users.
You are encouraged to experiment with your own schemes for handling
informative messages.
Using the Dialog Box
Dialog boxes can be created using esm_create_dbox(), and deleted using
esm_delete_dbox(). The programmer can supply to esm_create_dbox() string
descriptors with an appropriate title, text message, prompt message, and
default choice text. (All are optional.) Both the title and the prompt message
appear in bold face; the default text appears in a normal font. There is also
an optional string descriptor to hold the response typed by the user, and a
keycode to signal the end of the user's response.
When the box appears on the screen, the cursor is positioned immediately to the
right of the last character in the prompt string. If the user hits RETURN at
this point, the dialog box accepts the default string as its input. If the
user strikes other keys on the keyboard, the result depends on the length of
the user response string and the on the terminating keycode.
To enter non-default input, the user must first use the left-arrow or DELETE
keys to move backwards into the default text string, modify the text by
overstriking it, then hit RETURN.
If there is no response from the keyboard within 60 seconds of the creation of
the dialog box, it is removed and a timeout error is generated.
Converting Floating-Point to Text
In the routine convert_val2desc() ESM_DEMO
turns floating-point values, returned from scaling routines, into a string
descriptor suitable for displaying on the screen. In doing this it employs
handy VMS services called OTS$CVT_L_TZ, OTS$CVT_L_TI,
FOR$CVT_D_TE, and FOR$CVT_D_TF. These last two are obsolete Fortran
services, and aren't documented in current VMS manuals, but they do exactly
what we need:
FOR$CVT_D_TE converts floating-point values to text in exponential notation,
and FOR$CVT_D_TF converts them to floating-point decimal notation. A
photocopy of the old documentation on these routines is attached to the last
page of this chapter.
Inside ESM_DEMO
The source code for ESM_DEMO is listed here to serve as a model for your
own applications. It makes use of many features of the ESM services, it
responds to an event queue, and it organizes its work area into a field
map.
Details of the program's operation are discussed extensively in the embedded
comments.
The Header File ESM_DEMO.H
This header file sets up constants and data structures used in the ESM_DEMO.C
program. Especially notable are the structures used to manage the field map
which organizes the work area. Understanding it is the key to understanding
the ESM_DEMO.C program.
 /*
 **********************************************************************
 **********************************************************************
 ****                                                              ****
 ****                                                              ****
 ****           EPICURE Beamline Control System                    ****
 ****           Copyright (c) 1989 Fermilab                        ****
 ****                                                              ****
 ****            Header file for ESM Skeleton Routines Demo        ****
 ****                                                              ****
 ****                                                              ****
 **********************************************************************
 **********************************************************************

 Functional Description:
        Header file for ESM_DEMO.C, program to demonstrate the use of Epicure
        Screen Management  routines.  Defines structures and constants needed.

 Environment:
    VMS User mode. Character cell terminals or graphics terminals in character
    cell mode

 Published Information:
    RD Controls Software Release 33.0

 Change Requests:
 =============================================================================
 Author: Jack Schmidt                Fermilab Research Division Electrical
 Producer: Ed Dambik                    Dept./Controls Software Group
 Commentator: W. Skeffington Higgins (Remember the story of the potato princess
                                      who wanted to marry Walter Cronkite?)
                                     Fermilab Research Division SOD/Operations

*/

#include "epicure_inc:ftd.h"
#include "epicure_inc:dbuser.h"         /* Database definitions for property*/
#include "epicure_inc:daruser.h"        /* DAR definitions */
#include "epicure_inc:darmsg.h"         /* DAR messages */

#define NULL 0

/* Screen Message location and length */
#define MESSAGE_ROW     20
#define MESSAGE_COLUMN   1
#define MESSAGE_LENGTH  80

/* Screen field types (FM stands for "Field Map")  */
#define FM_DEVICE       1
#define FM_READBACK     2
#define FM_UNITS        3
#define FM_EOL          4
#define FM_TEXT         5

/* Data event definition */
#define EVT_C_DATA      EVT_C_USER+1

/* Device scaling flags. Set in the scaling pulldown menu routine. */
#define ENG_SCALE       1
#define INT_SCALE       2
#define RAW_SCALE       3
int  scaling_units;

/* Data associated with a particular data-acquisition request: */
struct data_info_descriptor {
        int handle;
        int sequence;
        struct DB_ANALOG_SCALING *scaling;
        };

/* Data associated with a field on the screen: */
struct field_map_descriptor {
        int     row,            /* Starting row of field */
                column,         /* Starting column of field */
                space_size,     /* Spacing from field end to next*/
                length,         /* Length of field */
                item;           /* Code identifying this field */
        };

/*

There is an array of structures which hold information about screen lines.
The name of this array is device_da.  One element of this array corresponds
to one line on the screen. Each element is a structure of type
device_da_descriptor, which is itself made of four structures:

Name: device_da[]               Structure Type: device_da_descriptor
         _______________________________________________________________
Name    |  *dainfo      |  name         |  reading      |  units        |
        |(ptr to struct)|               |               |               |
Type    |data_info_descr|field_map_descr|field_map_descr|field_map_descr|
        |_______________|_______________|_______________|_______________|

The *dainfo pointers are initialized to NULL.  If a device has been assigned
to a line, add_device() will make *dainfo point somewhere meaningful.  If
it's canceled, delete_device() will make it NULL again.

Note that the device_da array contains three elements. The first contains
a device/readback/units triplet of fields, all on row 5.  The second is
similar, with similar column positions and field lengths, all on row 6.

An "extra" element is stuck onto the end of the device_da array.  It is
initialized so that all rows, columns, etc. in its .name, .reading, and
.units fields are NULL, and the .item integer is FM_EOL.  This is by definition
the last element in the device_da array.  (EOL stands for "End Of List.")
 The reason for this arrangement
is to make it easy to add more elements to the array (corresponding to more
lines on the screen).  Routines which need to scan every element in the
array do not perform a fixed number of operations; instead, they look for
the FM_EOL and stop when they find it.  Thus to add more lines to the screen,
one need only add more initial elements to this array-- changing the code
of ESM_DEMO.C is not necessary.

*/
struct device_da_descriptor {
        struct data_info_descriptor *dainfo;
        struct field_map_descriptor
            name,
            reading,
            units;
            } device_da[] =
                {
                        {   {NULL},
                            {5, 5, 2, 12, FM_DEVICE},
                            {5, 19, 2, 10, FM_READBACK},
                            {5, 31, 2, 4, FM_UNITS}
                            },
                         {  {NULL},
                            {6, 5, 2, 12, FM_DEVICE},
                            {6, 19, 2, 10, FM_READBACK},
                            {6, 31, 2, 4, FM_UNITS}
                            },
        /* Here comes that final element: */
                         {  {NULL},
                            {NULL, NULL, NULL, NULL, FM_EOL},
                            {NULL, NULL, NULL, NULL, FM_EOL},
                            {NULL, NULL, NULL, NULL, FM_EOL}
                            }
                };

struct prompt_text_descriptor {
        int     row,            /* Starting row of field */
                column,         /* Starting column of field */
                length,         /* Length of Prompt text string */
                item;           /* Code identifying this field */
        char    text[35];       /* Prompt text */
        } text_field_map[]={  /* Make sure that the length equals the number
                               * of characters in the text string + 1 */
                {3, 5,  7, FM_TEXT, "Device"},
                {3, 19, 9, FM_TEXT, "Readback"},
                {3, 31, 6, FM_TEXT, "Units"},
                {4, 5, 31, FM_TEXT, "==============================="},
                {5, 5, 13, FM_TEXT, "____________"},
                {6, 5, 13, FM_TEXT, "____________"},
                {NULL, NULL, NULL, FM_EOL, NULL}};
The Program ESM_DEMO.C
Any program using ESM routines must include the ESM header file:
#include "epicure_inc:esmuser.h"
This header file (not to be confused with the ESM_DEMO.H file, which is
specific to our demo program) contains definitions, macroes, and ESM routine
templates needed by the application programmer. It's a good idea to read
through it before you write a program using the ESM routines.
 /*
 **********************************************************************
 **********************************************************************
 ****                                                              ****
 ****                                                              ****
 ****           EPICURE Beamline Control System                    ****
 ****           Copyright (c) 1989 Fermilab                        ****
 ****                                                              ****
 ****            ESM Skeleton Routines Demo                        ****
 ****                                                              ****
 ****                                                              ****
 **********************************************************************
 **********************************************************************

 Functional Description:
        Program to demonstrate the use of Epicure Screen Management
        routines.  Acquires data from a couple of devices selected by the
        user and displays it on the screen.  Menu allows the user to select
        scaling of data.

        Be sure to look in ESM_DEMO.H or you'll never figure out what all
        the peculiar structures are doing.

         Error handling is done by calling the routine indicate_err().  This
         puts error messages on MESSAGE_ROW (line 20, see ESM_DEMO.H) unless the
         status check is associated with a particular device, in which case the
         message is masked to give only its short version and placed in the
         device's "Readback" field in the work area. Unlike SIGNAL_FAILURE, this
         does not crash the program on a fatal error.   Message strings are
         arbitrarily truncated to a length of 80 characters.

 Environment:
    VMS User mode. Character cell terminals or graphics terminals in character
    cell mode

 Published Information:
    RD Controls Software Release 33.0

 Change Requests:
 =============================================================================
 Author: Jack Schmidt           Fermilab Research Division SOD/Operations
 Producer: Ed Dambik
 Commentator: W. Skeffington Higgins (Remember the story of the potato princess
                                      who wanted to marry Walter Cronkite?)
 Modification History:

11-Jun-88  JCS  GUINEA_PIG created to test ESM routines.
11-Jul-88  JCS  Final clean up for release.
01-Feb-89  JCS  Rewrote with data acquisition. Changed name from GUINEA_PIG
                to ESM_DEMO
24-Feb-89  WSH  Added LOTS of comments to ESM_DEMO.C and ESM_DEMO.H; rewrote
                error handling.
04-May-89  JCS  Added dialog box to run_away().
                Added default menu choice to scaling menu.
                New print menubar option- lists queues and prints pasteboard.
10-May-89  WSH  Integrated revised error handling with new Schmidt features.
12-May-89  EJD  Changed indicate_error() function to use row and column parameters.
*/
/* ESM_DEMO.C -
 =============================================================================
*/

#include stdio                      /* Standard C definitions */
#include "EPICURE_INC:esmuser.h"    /* ESM user definitions */
#include smgdef                     /* SMG definitions */
#include ssdef                      /* System messages */
#include ctype          /* Variable typing macros */
#include "esm_demo.h"   /* Header file specific to this program */

                         /* Status check macro */
#define SIGNAL_FAILURE(c)       if (!(c&1)) lib$signal(c)
#define RETURN_IF_BAD(s)        if (!(s&1)) return(s)
#define NOT_LOCATED     -1

                        /*  FUNCTION DECLARATIONS: */
void process_key();      /* Handles key events returned from esm_get_event*/
void process_data();     /* Handles data returned from the front-end */
void add_device();       /* Begins data acquisition from a device */
void delete_device();    /* Drops a device from the data acquisition list */
static locate_device();  /* Finds current device given cursor row and column */
void get_text();         /* Reads device name typed on screen */
void data_ast();         /* Adds event to queue when data reading is completed */
void menubar_routine();  /* Routine to call after a menu bar item is selected*/
void pulldown_routine(); /* Routine to call after a pulldown item is selected*/
static convert_val2desc(); /* Convert numeric data to string descriptor */
void run_away();         /* Exit the program */
int indicate_err();      /* Print error message on current row */
void clear_err();        /* Put blanks in message space */

/* Scaling routines:  It's vital to declare these properly when you use them! */
extern float scl_raw2eng();
extern float scl_raw2int();

static readonly $DESCRIPTOR(title_d, "Example Skeleton Program");  /* Program title */

/* Menu item arrays. Spaces are packed in menu bar array to better format screen
 * appearance
 */
static char     menubar[1][11] =  /* Menu bar items */
        {" Scaling  "};

static char     pulldown[3][13] =  /* Pulldown menu items */
        {"Raw", "Intermediate", "Engineering"};

main()
{
 union  EVENTDEF  event;  /* Create union for esm_get_event */
 int  event_type;         /* Recieves type of event code */
 int    sts;              /* Status returned from ESM calls */
 int    i;                /* Counter for loop */
 long int row,column;     /* Cursor location for text */
 short term;             /* terminator */
$DESCRIPTOR(text_d, text_field_map[0].text); /* Descriptor for screen I/O */

 /* Call macro defined in esmuser.h to convert array of strings into a
  * string array descriptor. These will be the menu bar items.
  */
 DESCRIPTORA( menubar_d, menubar);

 /* Initialize the screen. Pass program title, menu_bar items, and routine
  * to call when a menu bar item is selected. The menu bar choices 'Print'
  * and 'Exit' are always added to the menu bar items requested.
  */
 sts = esm_init( &title_d, &menubar_d, menubar_routine);
 RETURN_IF_BAD(sts);

 sts = da_init();
 RETURN_IF_BAD(sts);

/* Lets the application programmer handle alphanumeric keys (they are not
echoed to the screen) */
 esm_set_mode(ESM_NOECHO);

/* Initialize scaling routines to engineering units.*/
 scaling_units = ENG_SCALE;

/* Initialize display. Notice that the loop exits when an item field of
 * FM_EOL is found. By defining FM_EOL as the last item in the structure,
 * more items can be added to the structure without having to modify
 * this routine. (See comments in file ESM_DEMO.H)
 */
 i=0;
 while (text_field_map[i].item != FM_EOL){
        text_d.dsc$a_pointer = text_field_map[i].text;
        text_d.dsc$w_length  = text_field_map[i].length;
        row = text_field_map[i].row;
        column = text_field_map[i].column;
        sts = esm_put_chars(&text_d, &row, &column, 0);
        SIGNAL_FAILURE(sts);    /* Check for non-recoverable ESM errors */
                                /* If you've got bad status here, might as
                                        well give up */
        i++;
        }

/* Locate cursor at first settable field. */
 esm_set_cursor_abs(&5, &5);

 /* Loop forever. Get events and branch to appropriate routine. Event
  * information is defined in esmuser.h
  */
 for(;;) {                                      /* Keep doing this forever */
        event_type = esm_get_event( &event);   /* Read event queue; if there
                                                is no event, hibernate until
                                                an event appears */
        switch (event_type) {                  /* Switch on event type */
                case EVT_C_KEY:                /* Key strike event */
                        process_key( &event);  /* Routine to handle keys */
                        break;
                case EVT_C_DATA:                /* Read data event */
                        process_data( &event);  /* Routine to handle display
                                                of a fresh readback */
                        break;
               }
          }
}
�
/***********************************************************************/
/* Routine called from main() when the event is a key-strike.
*/
void process_key( event_data)
union EVENTDEF *event_data;
{
int sts; /* Status returned from ESM and STR calls */
int current_row, current_column; /* Current cursor position */
int index, field_id;
char names[13];
$DESCRIPTOR(name_d,names);
struct dsc$descriptor_s key_d =
{1, DSC$K_DTYPE_T, DSC$K_CLASS_S, &event_data->key.keycode};
/* Act upon the keystroke */
switch(event_data->key.keycode) {
/* When a CR is pressed a new device is added if:
* 1. The CR was pressed in the device field. [locate_device()]
* 2. The text preceding the CR has at least one
* alphanumeric character. [get_text() & isalpha()]
* Otherwise the program ignores the CR.
*/
case SMG$K_TRM_CR:
case SMG$K_TRM_ENTER:
current_row = event_data->key.row;
current_column = event_data->key.column;
/* Check to see if cursor is in a modifiable field;
if so, */
index = locate_device(current_row, current_column);
if (index == NOT_LOCATED)
return; /* If cursor is not within a modifiable
* (names) field, return to main() and
* wait for another event. */
get_text(&name_d, index, current_row, current_column);
/* Note this restriction: User MUST type device name in first
column-- anyplace else and the leading underscores are taken
to be part of the name, which will lead to a bogus device name. */
/* Delete the device that presently lives in this spot: */
delete_device(index);
/* Add the newly typed string, if it starts with an alphabetic
character */
if(isalpha(names[0]))
add_device(&name_d, index);
esm_set_cursor_abs(¤t_row,¤t_column);
break;
case SMG$K_TRM_CTRLZ:
case SMG$K_TRM_F10:
/* CTRL-Z - exit program */
run_away();
break;
default:
/* If the keystroke is not a carriage return or control-Z,
check to see if the cursor is on a modifiable field;
if so, echo the character to the screen;
if not, ignore it. */
current_row = event_data->key.row;
current_column = event_data->key.column;
index = locate_device(current_row, current_column);
if (index == NOT_LOCATED)
return;
/* Print the character to the screen */
esm_put_chars(&key_d,¤t_row,¤t_column,0);
/* Note that you could modify this "switch" statement to test for
other keyboard keys. "Control-" keys, however, are not passed
to the programmer by the ESM routines, except for control-Z. */
}
}
�
/**************************************************************************/
/* Receives data from the front end. Called from main() after a data event
 * happens (type EVT_C_DATA).  Cycles through all device_da elements, looking
 * for those which contain information.  Gets the returned data for each
 * device, and checks returned sequence number to see if data are new.
 * Checks the type of scaling to use
 * (default is engineering units), and displays to screen.  Reads, but does
 * not modify, the global variable scaling_units.
 */
void process_data()
{
 int sts;
 int index = 0;
 int    row, col, new_row;
 int data, sequence;
 float value;
 char units[5]={"hex "};
 char out[11];
 $DESCRIPTOR(units_d, units);
 $DESCRIPTOR(out_d,out); /* Descriptor for screen data I/O */

 esm_cursor_location( &row, &col);

 while (device_da[index].name.item != FM_EOL) {
        /* Do the following for every line on the screen (ends when you
           hit last element of device_da.name.item array) */
        if (!device_da[index].dainfo){
        /* Pointer to this structure was initialized to zero.  If it's never
         * been changed, then it's still zero, and we should skip it. */
                index++;
                continue;
                }
        /* Now get the returned data associated with this device */
        sts = da_get_data(&device_da[index].dainfo->handle, 0,
                &data, 0, 0, &sequence);
        indicate_err(sts, device_da[index].reading.row,
                device_da[index].reading.column,
                device_da[index].reading.length);
        if (sequence == device_da[index].dainfo->sequence){
                index++;
                continue;} /* If sequence number hasn't changed, skip this
                                one-- there's no new data. */
        device_da[index].dainfo->sequence = sequence; /* Store new sequence # */
        /* Check the global variable scaling_units to choose scaling */
        switch( scaling_units){
                case ENG_SCALE:
                        value = scl_raw2eng(&data,
                                device_da[index].dainfo->scaling, &sts,units);
                        indicate_err(sts, device_da[index].reading.row,
                                device_da[index].reading.column,
                                device_da[index].reading.length);
                        break;
                case INT_SCALE:
                        value = scl_raw2iu(&data,
                                device_da[index].dainfo->scaling, &sts, units);
                        indicate_err(sts, device_da[index].reading.row,
                                device_da[index].reading.column,
                                device_da[index].reading.length);
                        break;
                case RAW_SCALE:
                        value = (float)data;
                        break;
                        }
        /* Prepare for output by putting length into out_d descriptor */
        out_d.dsc$w_length = device_da[index].reading.length;
        /* Convert returned value into a string descriptor */
        sts= convert_val2desc(value,&out_d);
        indicate_err(sts, device_da[index].reading.row,
                device_da[index].reading.column,
                device_da[index].reading.length);
        /* Output out_d string to the Readback field location on screen */
        esm_put_chars(&out_d, &device_da[index].reading.row,
             &device_da[index].reading.column,0);
        /* Output units_d string to the Unit field on screen */
        esm_put_chars(&units_d, &device_da[index].units.row,
                &device_da[index].units.column,0);
        /* Next device, please */
        index++;
        }

 /* Restore cursor to location previous to call*/
 esm_set_cursor_abs(&row,&col);
}
�
/*****************************************************/
/* Routines written to start data acquisition on the current
 * device */
void add_device(device_d,index)
struct dsc$descriptor_s *device_d;
int index;
{
 int sts;

 /* Allocate enough memory for one more device, and stick pointer to it
    into device_da[index].dainfo */
 device_da[index].dainfo = malloc(sizeof (struct data_info_descriptor));

        /* Add the device to the list of requests */
 sts = da_add_request_name(device_d, DB_C_PRP_READING, 0,
        0, 0, 0, 0, &device_da[index].dainfo->handle);
 if (!indicate_err(sts, device_da[index].reading.row,
           device_da[index].reading.column, device_da[index].reading.length))
                clear_err(device_da[index].reading.row,
                        device_da[index].reading.column,
                        device_da[index].reading.length);

        /* Process these data requests and check the status of the
           add-device operation */
 sts = da_process_request_wait(data_ast);
 if (!indicate_err(sts, MESSAGE_ROW, MESSAGE_COLUMN, MESSAGE_LENGTH))
        clear_err(MESSAGE_ROW, MESSAGE_COLUMN, MESSAGE_LENGTH);

 /* In case processing failed, find out whether the [index] device was the
        trouble, and why */
 if (!(1&sts)){
    sts = da_get_add_status(&device_da[index].dainfo->handle);
    indicate_err(sts, device_da[index].reading.row,
                device_da[index].reading.column,
                device_da[index].reading.length);

 /* Delete this guy so he won't give us any more trouble */
    delete_device(index);
    return;
    };
 /* From the Device Database information returned, find the scaling attribute
        and stick it into the device-scaling location.   */
 sts = da_get_db_ptr(&device_da[index].dainfo->handle,
                DB_C_ATR_SCALING, &device_da[index].dainfo->scaling);
 indicate_err(sts, device_da[index].reading.row,
                device_da[index].reading.column,
                device_da[index].reading.length);
}
�
/*****************************************************/
/* Routines written to stop data acquisition  on the current
 * device, and to drop it from the list of active devices */

void delete_device(index)
int index;
{
 int sts;

 if (!device_da[index].dainfo)
        return; /* Return if there's NULL in the pointer-- hasn't been used */

        /* Put the device on the "to be dropped" list */
 sts = da_delete_request(&device_da[index].dainfo->handle);
 indicate_err(sts, device_da[index].reading.row,
                device_da[index].reading.column,
                device_da[index].reading.length);

        /* Process all data requests and drop requests
                and check status of the drop */
 sts = da_process_request_wait(data_ast);
 indicate_err(sts, MESSAGE_ROW, MESSAGE_COLUMN, MESSAGE_LENGTH);

 free(device_da[index].dainfo); /* Free up the memory occupied by device */
 device_da[index].dainfo = NULL;        /* NULL in  pointer signifies empty
                                                spot for device */
}
�
/**************************************************************/
/* This routine is passed the current row and column of the cursor and returns
 * fieldmap array offset if found. If not, a value of NOT_LOCATED (-1) is returned.
 */
locate_device( row, column)
int row, column;        /* current cursor location */
{
 int i= 0;              /* index */

 while (device_da[i].name.item != FM_EOL) {     /* Go through the list of
                                                        devices */
        /* See if row and column of cursor matches namefield of a device */
        if (row != device_da[i].name.row){
                i++;
                continue;
                }
        if ((column >= device_da[i].name.column)  &&
            (column <= device_da[i].name.column  + device_da[i].name.length-1))
        /* If we're in the right spot, return our position in list of devices: */
                return(i);
        i++;
        }
 return(NOT_LOCATED);
}
�
/**************************************************************/
/* Routine written to read the device name on the screen. Called from
 * process_key() when a <CR> has been hit.  Reads in string,
 * displays the string in boldface capitals. Passes a pointer to the string
 * back to process_key().
 */
void get_text(string_d, findex, row, col)
struct dsc$descriptor_s *string_d;      /* Input string descriptor */
int       findex;       /* Index into field_map */
long int  row;          /* Current cursor row */
long int  col;          /* Current cursor column */
{
int sts;    /* Status returned from set field */
long int frow,fcolumn,c_row,c_col,a_row,new_col = 0;
int flength, slength;
char tmpstr[80];
$DESCRIPTOR(tmp_d,tmpstr);        /* Stores the line read from the screen */
char trimstr[13]="            "  /* Twelve blanks (max devicename length) */
$DESCRIPTOR(trim_d,trimstr);

 frow = device_da[findex].name.row;
 fcolumn = device_da[findex].name.column;
 flength = device_da[findex].name.length;
 string_d->dsc$w_length = flength;  /* Input string length */

 /* Locate cursor to the beginning of the field before reading the line */
 sts = esm_set_cursor_abs(&frow,&fcolumn);
 sts = esm_read_from_work_area( &tmp_d); /* This reads all characters from
                                        current position to right edge of screen */
  /* GOT TO EXPLAIN WHAT HAPPENS WHEN TOO MANY CHARACTERS TYPED */
 /* Calculate how many columns to read from the line (string length) */
 new_col = col - fcolumn;
 /* The library function below copies the characters of tmp_d, from the
        first until the new_col-th, into string_d */
 STR$POS_EXTR(string_d, &tmp_d, &1, &new_col);
 /* Now the string typed by the user ought to be in string_d. */
 /* The function below converts string_d to all uppercase */
 STR$UPCASE(string_d,string_d);
 /* Put a NULL after the last character in the string */
 string_d->dsc$a_pointer[flength]= NULL;
 /* Read data pointed to by string_d (the character string typed by the
    user), format it as a string, and stick it into location pointed to by
    trimstr */
 sscanf(string_d->dsc$a_pointer,"%s",trimstr);
 /* Copy flength characters from trimstr, and (flength-strlen) characters
    from a string of blanks, into string_d.  Note the peculiar %.*s format.
     */
 sprintf(string_d->dsc$a_pointer,"%.*s%.*s",flength,trimstr,
        flength-strlen(trimstr),"                ");
 /* The result of all this is that string_d now has the string typed by
    the user in it, padded by blanks on the right.  This is certainly what
    we want to output on the screen (this happens in the line below); it also
    turns out that the da_* routines are perfectly happy with this format--
    they know how to keep the device name and throw away the blanks.  So
    eventually we will pass this string to da_add_request too, in the routine
    add_device(). */
 esm_put_chars(string_d, &frow, &fcolumn, &SMG$M_BOLD);

 /* Put the cursor back where it was when this routine was called  */
 sts = esm_set_cursor_abs(&row,&col);
}
�
/***********************************************************************/
/* Data read completed. Add event to queue. Then return. Eventually main()
   will wake up and notice the new event.*/
void data_ast()
{
 int sts;

 /* Stick an event of type EVT_C_DATA onto the event queue */
 sts = evtq_add_event(EVT_C_DATA);
 }
�
/************************************************************************/
/* Routine called from select_from_menu. Only the 'Scaling'and 'Exit' choices
 * do anything. The scaling choice produces a pulldown menu. The 'Exit'
 * option is handled internal to ESM. The 'Exit' option will first call
 * the user routine associated with the  menu bar and then use the ESM
 * internal exit routine. This provides the application programmer with the
 * ability to perform his own clean-up routines before exiting.
 */

void menubar_routine(menu_id, menu_item)
int *menu_id;   /* id of menu menu_item was selected in */
int *menu_item; /* menu item number */
{
 int    sts;         /* returned status from ESM calls */
 int    type;        /* type of menu */
 int    sel_item;    /* address of item selected */
 unsigned vmenu;    /* Pulldown menu id */
 struct string_array_descriptor *ch_ptr;

/* Call macro defined in esmuser.h to convert array of strings into a
 * string array descriptor. These will be used to create the pulldown menu
 * items.
 */

 DESCRIPTORA( pulldown_d, pulldown);

 /* Assign the type of the menu; in this case, a vertical one. (See ESMUSER.H
    for definitions.) */
 type = ESM_VERTICAL;

/* Assign the pulldown menu items depending on which menubar item was chosen.
   In this example, there's only one choice (Scaling) that gets you a pulldown
   menu.  You would extend this by putting in more cases into this "switch"
   statement, and providing extra "pulldown_routine()"-like functions, one
   for each choice. Or, rather than providing extra routines, you could
   rewrite pulldown_routine to take different actions for different menu
   choices, by checking the menu ID number.  */
 switch( *menu_item){
            case 1 :
                ch_ptr = &pulldown_d;
                break;
            default :
                return;
                   }

/* Create a pulldown menu, select an item from the menu and then delete
 * the menu. Since location wasn't specified, the menu is created at the
 * current row +1 and current column. The default option has been specified so
 * that when the menu is entered the menu cursor will be located on the third
 * menu item.
 */
 sts = esm_create_menu( &vmenu, ch_ptr, &type,
          0, 0, pulldown_routine);
 SIGNAL_FAILURE(sts);   /* Check for non-recoverable ESM errors */

 sts = esm_select_from_menu( &vmenu, &sel_item, &3);
 if (sts != SMG$_EOF)
          SIGNAL_FAILURE(sts);  /* Check for non-recoverable ESM errors */
 sts = esm_delete_menu( &vmenu);
 SIGNAL_FAILURE(sts);   /* Check for non-recoverable ESM errors */
}
�
/************************************************************************/
/* Routine called when a SCALING pulldown menu item is selected. This menu
 * allows the user to change scaling parameters.
 */
void pulldown_routine(menu_id, menu_item)
int *menu_id;   /* id of menu menu_item was selected in */
int *menu_item; /* menu item number */

{
 int    sts;        /* Status returned from ESM calls*/

 /* The options here are pretty simple.  All we're doing here is calling
    the global integer variable scaling_units.  The details of scaling are
    done, using this value to decide which type of scaling to use, in the
    routine process_data(). */
 switch( *menu_item){
            case  1 :
                scaling_units = RAW_SCALE;
                break;

            case 2 :
                scaling_units = INT_SCALE;
                break;

            case 3 :
                scaling_units = ENG_SCALE;
                break;
           }
}
�
/********************************************************/
/* Routine written to convert data to string descriptor.
   Be prepared to see a lot of system calls (stuff with a dollar sign in
   it...) To understand these, read *VAX/VMS Run-Time Library Routines
   Reference  Manual*  or type HELP RTL and grope around in there.
   (You will not find the FOR$ calls, which are a special case.  See below.)
*/
convert_val2desc(value,text_d)
float value;  /* Scaled data to convert to text */
struct dsc$descriptor_s  *text_d; /* Returned descriptor */
{
 float uns_value;
 int sts, ivalue;

 if (scaling_units == RAW_SCALE){
        ivalue = (int)value;
        sts = OTS$CVT_L_TZ(&ivalue, text_d,1);
        /* Take ivalue (integer value), make it a hexadecimal string, and
           stuff it into descriptor text_d */
        return(sts);
        }
 if (value < 0.0)
        uns_value = -value;
 else
        uns_value = value;

if (((uns_value > 999)||(uns_value < .01))&&(value != 0.0))  /* Use scientific
                                                                notation */
 /* If absolute value is bigger than 1000 or smaller than .01 */
 {
        sts = FOR$CVT_D_TE(&value, text_d, 2, 0,0,0,0);
        /* This is an obsolete FORTRAN service, but it does just exactly what
        we need here: converts a floating-point value to scientific notation
        and plunks it into a string descriptor.  We'll provide documentation for
        this in an appendix to our manual; unfortunately, it's not found in
        any current DEC manuals.  */

        RETURN_IF_BAD(sts);
 }
 else if ((value - (int)value) == 0)    /* If it's an integer, use
                                           decimal integer text format */
 {
        ivalue = (int)value;
        sts = OTS$CVT_L_TI(&ivalue, text_d,1);
        /* Convert signed integer to decimal text string descriptor */
        RETURN_IF_BAD(sts);
 }
 else                                   /* Use floating point text format*/
 {
        sts = FOR$CVT_D_TF(&value, text_d, 2, 0,0,0,0);
        /* Yes, this is another mysterious discontinued Fortran service.
           Don't worry, we'll get you some kind of writeup on this.  */
        RETURN_IF_BAD(sts);
 }
 return(SS$_NORMAL);
}
�
/******************************************************************/
/* Exit the program gracefully...
 */
void run_away()
{
int sts;
short term;             /* terminator */
int dbrow=5,dbcol=3;    /* row and column for dialog box */
long dboxid;            /* displayid for box */
char ans;               /* First character of reply converted to uppercase */
char reply[2];          /* String to hold user reply */
$DESCRIPTOR(boxtitle_d, "Sanity Check");
$DESCRIPTOR(reply_d, reply); /* Descriptor for user reply */
$DESCRIPTOR(prompt_d, "Do you really want to exit? "); /* Verify exit selection*/
$DESCRIPTOR(dfltstr_d, "Y");  /* default response to prompt */

/* Create dialog box to verify user wants to exit! A default response of (Y)es
 * has been added. To change the default choice the user must locate the cursor
 * over the default choice (in this case the `Y') and type something else.
 */

 sts = esm_create_dbox(&dboxid, &dbrow, &dbcol, &boxtitle_d, 0, &prompt_d,
        &dfltstr_d, &reply_d, &term);
 SIGNAL_FAILURE(sts);   /* Check for non-recoverable ESM errors */
 ans = toupper(reply[0]);
 if (ans != 'Y')
        return;

 /* Clean up the menu bar and stuff and leave a neat screen for the user
    to look at. */
 esm_exit();
}
�
/*************************************************************/
/* Translate a condition code to text of indicated length. */
/*      (c) Copyright 1988 Jack 'n' Ed Software, Inc.      */
/* The following line shows an awesome and terrible way to get a pointer
 * to a structure back from a function.  Note the use of the asterisk.
 * In other words, this function has type "dsc$descriptor_s," rather than
 * "void" or "int" or whatever.
 */
struct dsc$descriptor_s *
get_message(condition, length)
int     condition, length;
{
 int    sts, i;
 int    flags = 15;     /* Flags to be used in the SYS$GETMSG call which
                        ask for message ID, message TEXT, SEVERITY,
                        and FACILITY-- the whole works */
 short  msglen;
 static char    text[81];
 static $DESCRIPTOR(text_d, text);      /* Create descriptor to
                                                receive error message */
 if ((length == 0)||(length > 80)) {
        length = 80;    /* We'll truncate message to 80 characters */
        }
 else if (length < 20)
        flags = 2;      /* Get message ID only, not enough room! */

 text_d.dsc$w_length = length;

 sts = SYS$GETMSG(condition, &msglen, &text_d, flags, 0);
 /* Given condition, get back error message string descriptor & length */
 for (i = msglen; i < length; i++)      /* Fill with blanks if neccessary */
 {
        text[i] = ' ';
 }
 text[length] = NULL;           /* Terminate the string with a NULL */
 if (sts == SS$_MSGNOTFND)      /* If no translation of condition code found */
 {
        sprintf(text, "%s%x", "\%E ", condition);       /* Supply hex value */
 }
 return(&text_d);
}
�
/**********************************************************/
/* Check supplied condition value. If error is indicated, display truncated
 * translation of error code in error zone at bottom of work area and
 * return TRUE.
        (c) Copyright 1988 Jack 'n' Ed Software, Inc.
 */
int indicate_err(condition, row, column, len)
int condition;          /* Condition code to be tested */
int row;                /* Row to place error messages */
int column;             /* Column to place error messages */
int len;                /* Length of error messages */
{
 static int error_count = 0;       /* Initialize this to 0, increment on each
                                        call-- use this to keep track of row */
 int    sts;
 long int abs_row, abs_col;     /* Current cursor location */

 esm_cursor_location(&abs_row,&abs_col);  /* Get current location */

 if (condition != SS$_NORMAL)   /* If the condition is other than normal */
 {                              /* (information, warning, fatal, etc.) */
         clear_err(row, column, len);
         esm_put_chars(get_message(condition, len), &row, &column, 0);
         /* Write the error message (truncated to len characters)
                to given row and column */
         esm_set_cursor_abs(&abs_row,&abs_col);
         /* Put cursor back where you found it */
        }
 error_count++;         /* Increment count  */
 if (condition & 1)
        return(FALSE);  /* Return FALSE if condition is a failure;
                           let the application programmer decide
                           what to do about it */
 else
        return(TRUE);
}
�
/*************************************************************/
/* Clear any error messages left in the row's reading field. */
/*      (c) Copyright 1988 Jack 'n' Ed Software, Inc.
*/
void clear_err(row, column, len)
int row;                /* Row to clear error messages */
int column;             /* Column to clear error messages */
int len;                /* Length of error messages to clear */
{
 int sts;
 sts = esm_erase_chars(&len, &row, &column);
 SIGNAL_FAILURE(sts);   /* Check for non-recoverable ESM errors */
}
Filler page here.
Converting Floating Point to Text
Put DEC documentation here.
Using Graphics Routines
Applications Program Librarian
Application Data Files
Central Storage and DFS
The EPICURE Library Yellow Pages
Security, Privacy, Legal
rwest@fsus04.fnal.gov